The White Castle - A Solo Review
23 Oct 2023, reviewed by Kristof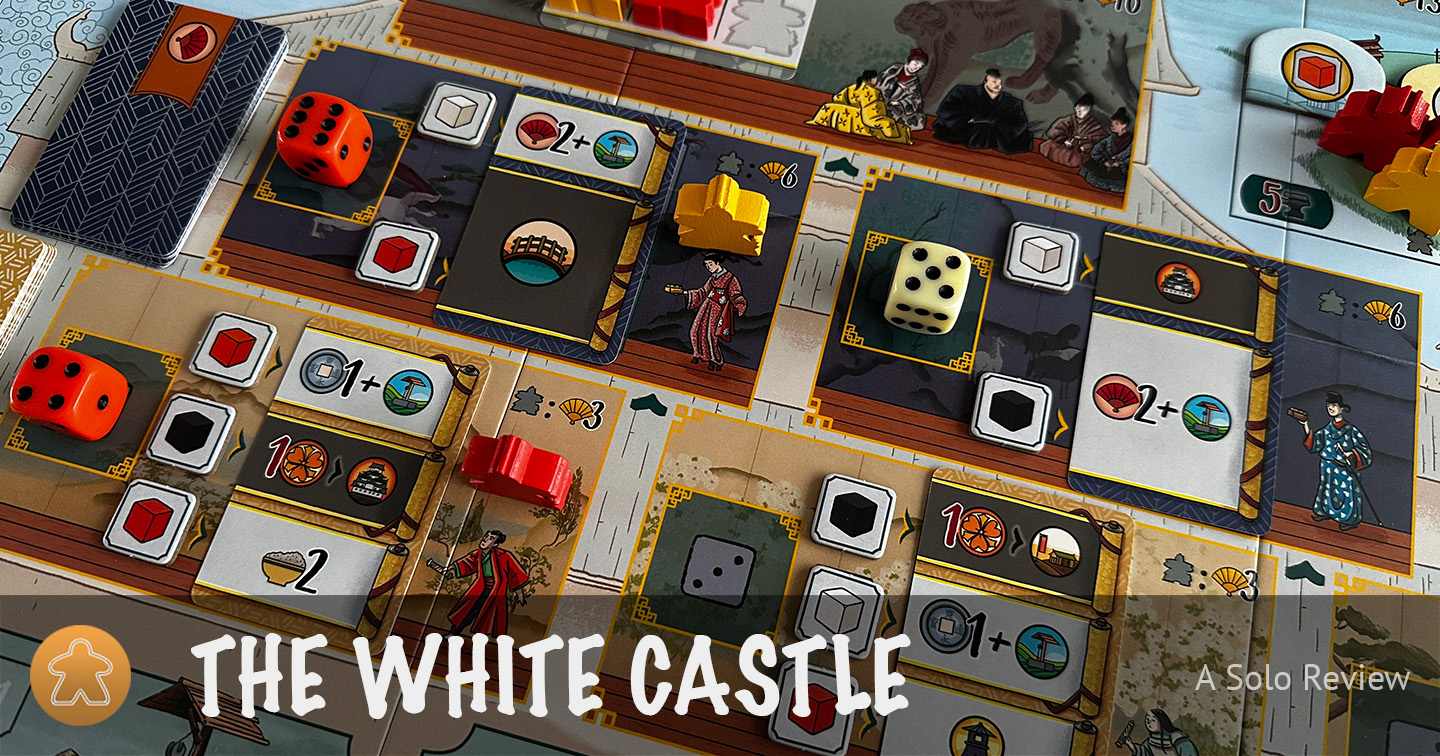
Japan, 1761. You’re the leader of one of the many minor clans near Himeji Castle. To secure the future of your clan, you will need to make sure you gain influence with Daimyo Sakai Tadazumi. More influence than the other clans. Of course they won’t just give you free reign; they want exactly the same. Will you succeed and lead your clan to victory?
Name: The White Castle
Designer: Sheila Santos and Israel Cendrero
Solo designers: Sheila Santos and Israel Cendrero
Publisher: Devir
Game type: dice worker placement
What is The White Castle?
The White Castle is a dice worker placement game that takes place in the famous Himeji Castle in Japan, around 1761. You play the role of the leader of a minor clan, trying to secure your position in the court of Daimyo Sakai Tadazumi.
By selecting available dice and placing them on available worker placement spots you get to gather resources, have your gardeners tend to the landscape, send your courtiers to the castle itself to climb the social ladder and dispatch your warriors to spar in the training yards.
After only three rounds of three turns the game ends and whoever has managed to gain the most victory points via their gardeners, courtiers and warriors is declared the winner.
How does it play?
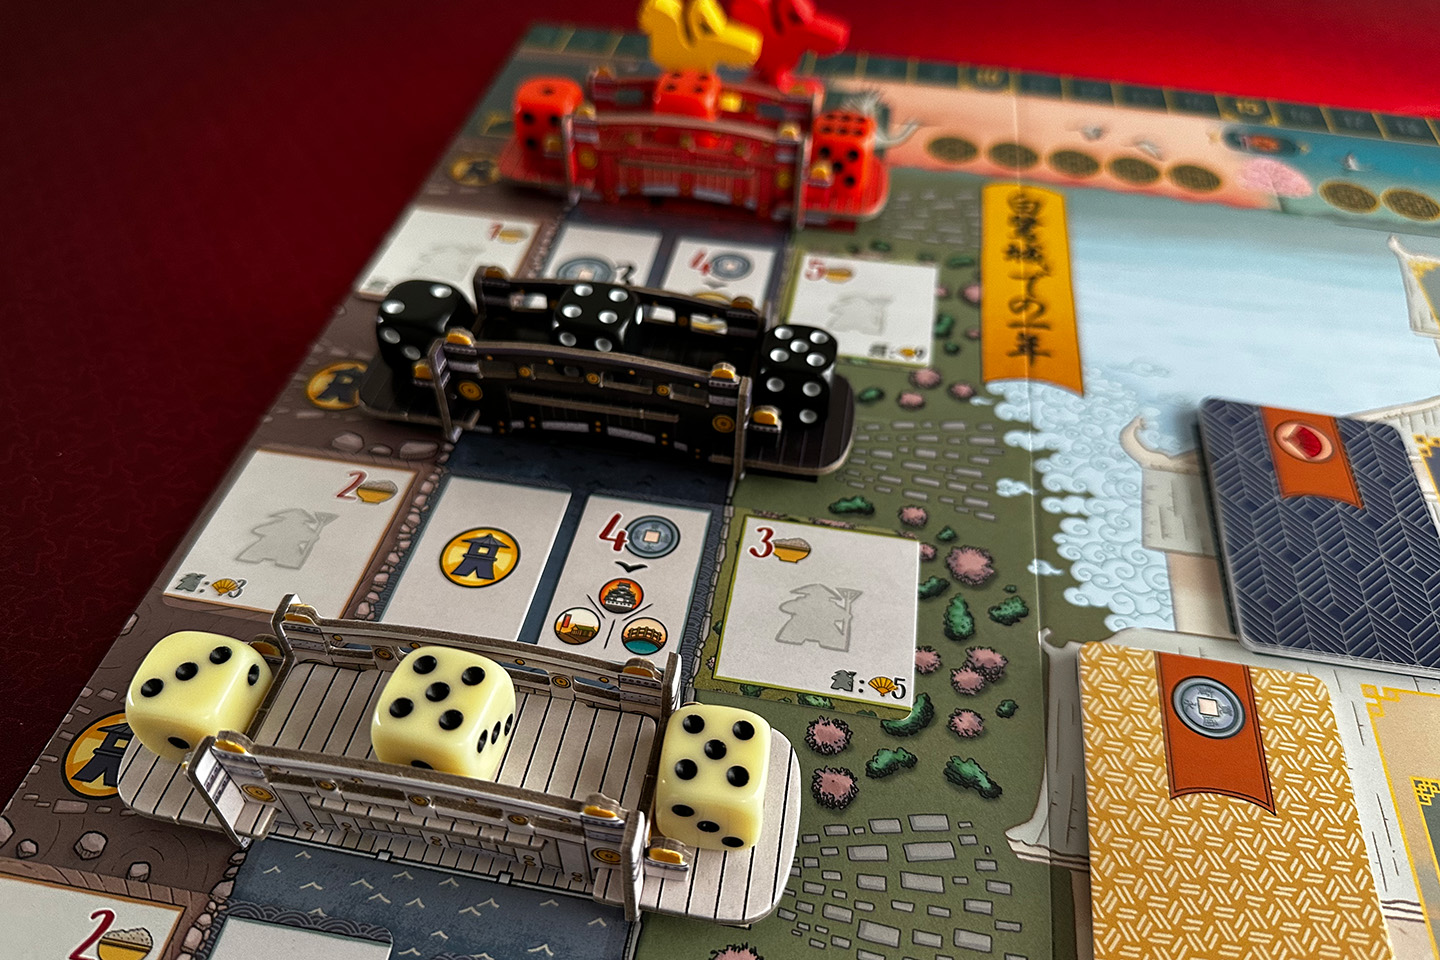
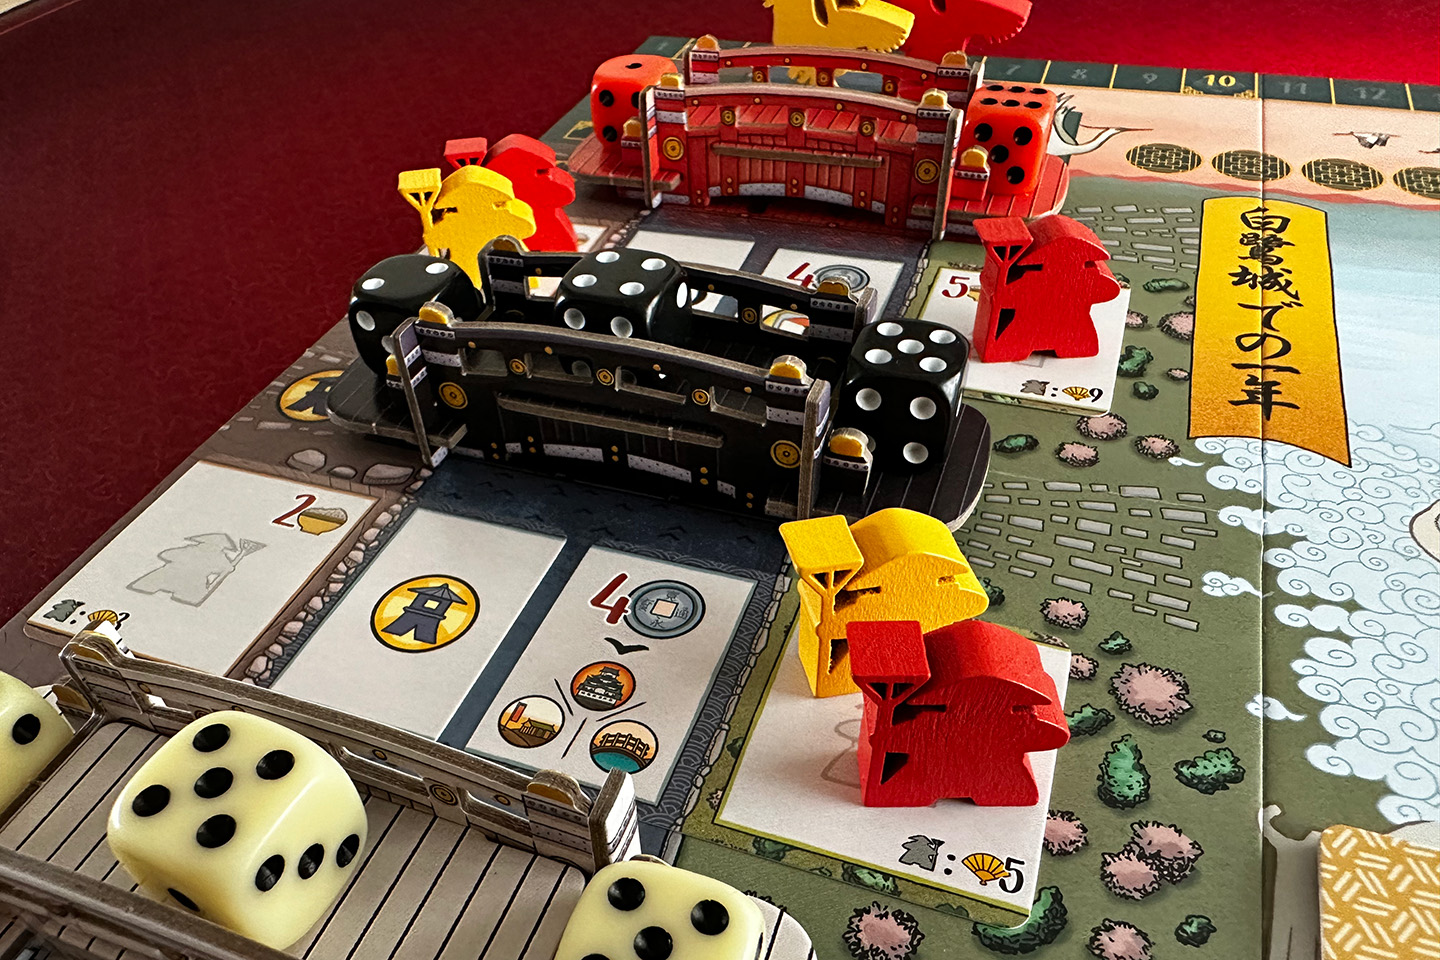
The left side of the game board contains three bridges: a red one, a black one and a white one. These are printed on the board, but the game also comes with pretty cardboard bridges you have to assemble before the first play. For a solo game, you need nine dice; three in each of the bridge’s colors. At the start of every round you roll all dice and put them on the bridge of the corresponding color. The lowest value die goes on the far left of the bridge, the highest value die goes on the far right of the bridge and the remaining die goes in the middle. During your turn you will select one of the dice on the far left or the far right on a bridge and place it on one of the worker placement spots (more about those later). At the end of your turn, if there is still is a die on the middle of the bridge you took a die from, you move it to the left or right depending on which die you took. So by taking a die from the left or the right, you make a middle die available for the next turn. Definitely something to keep in mind when planning out your future actions!
There are worker placement spots in four different locations; three on the main game board and one on your personal player board. Regardless of where they are located, they have one thing in common: they all have a specific die value printed on them. If you place a die with a higher value on a spot, you gain the difference in coins. In order to place a die with a lower value, you need to be able to pay the difference in coins. If the value is the same, you don’t pay but you also don’t gain coins.
Another thing almost all placement spots have in common is that there can only ever be one die per spot in a two player or a solo game. Except for the placement spot on the well: there’s no limit to the number of dice that can be placed there.
After you’ve placed a die and either gained or paid coins, you get to take the action associated with that spot.
- The well. This is somewhat a fallback action because it has no limit on the amount of dice that can be placed here. The single action spot on the well shows a die value of 1, so you will also never have to pay to place a die there. Placing a die on the well gives you, next to coins based on the die value, a Daimyo Seal and two random benefits determined during setup. The benefits are typically one of the three main resources (food, iron and mother of pearl), moving up on the influence track (this determines turn order) or another Daimyo Seal. At any time you can trade in two Daimyo Seals for one resource of your choice, or one Daimyo Seal for one coin.
- Outside the walls. There are two spots in this location and they both show a die value of 5, meaning you’ll need to pay to go here unless you place a die showing a 5 or a 6. One spot lets you choose between taking a Gardener action and taking a Castle action, while the other one lets your choose between taking a Warrior action and a Castle action. More on those later.
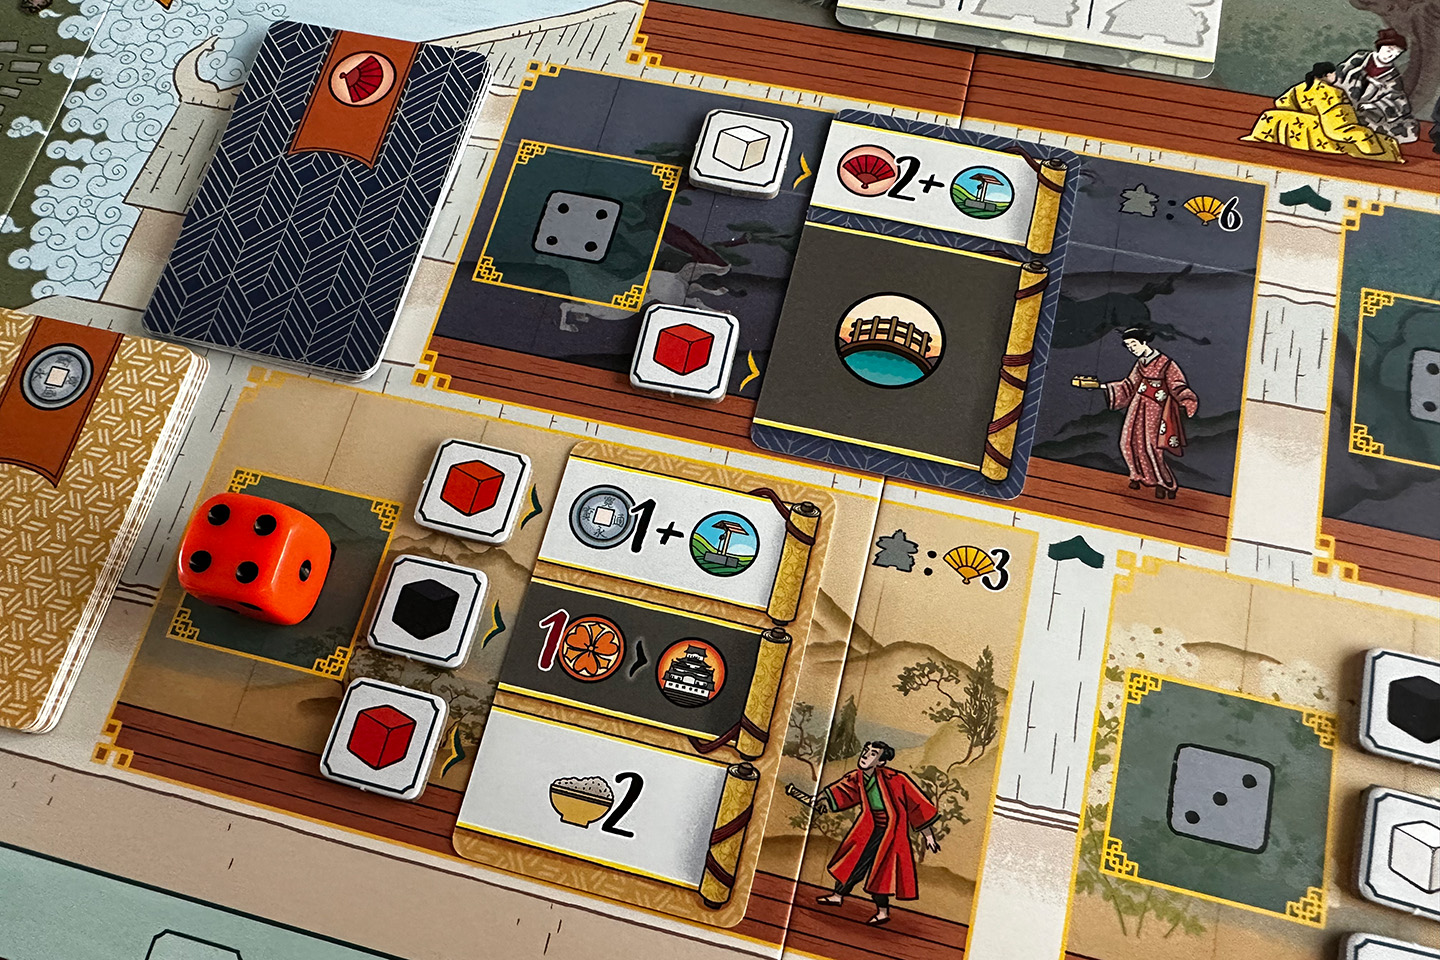
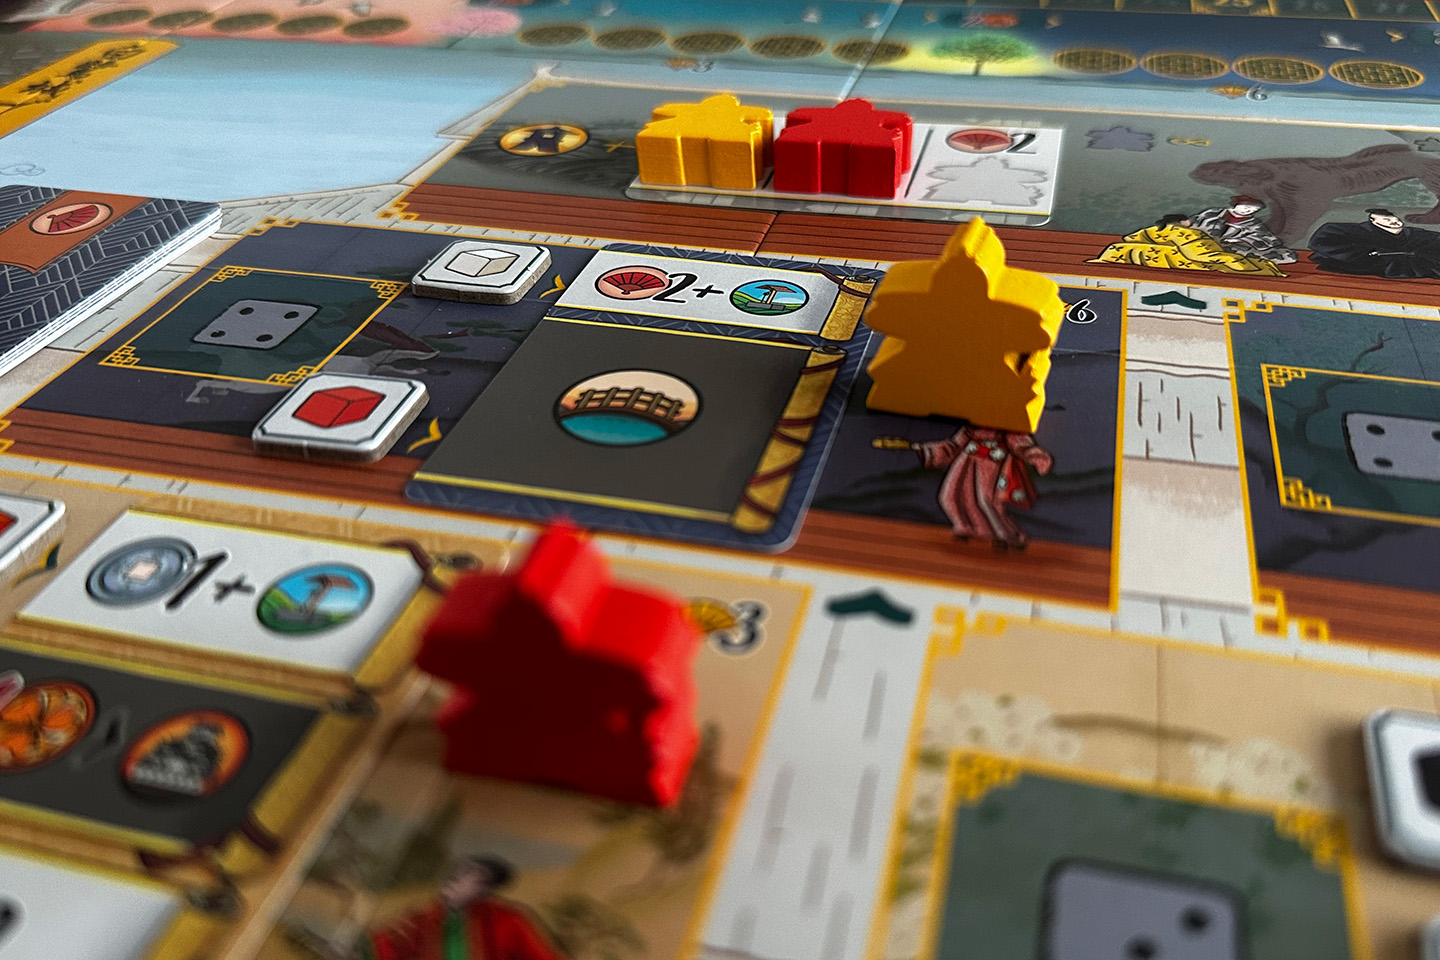
- The castle. The castle has five spots to place dice. Three showing value 3 and two showing value 4. What they do can differ from game to game and even from turn to turn. You see, every spot gets two or three dice tokens during setup. These dice tokens determine which color dice can be placed on that spot. Next to that, each spot also gets an action card during setup. Each card shows two or three actions and they line up with the dice tokes. If you place a die on an action spot in the castle, you can take all actions on the card that line up with dice tokens of the color of die you placed on the spot. These actions either let you gain things (resources, influence, immediate victory points) or let you take a Gardener, Castle or Warrior action. Again, more on those later.
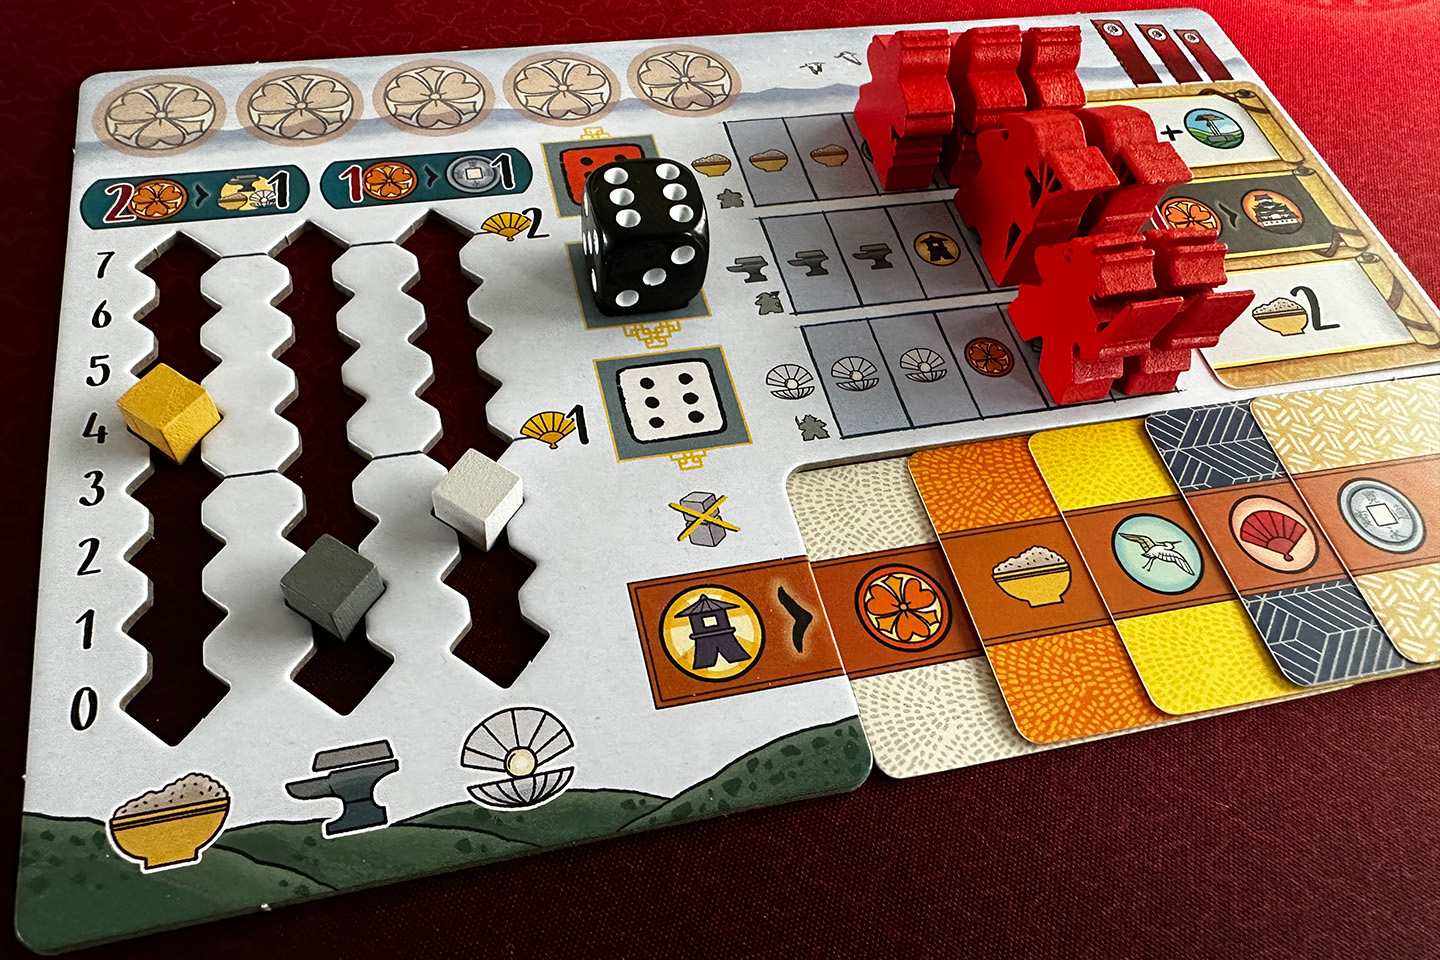
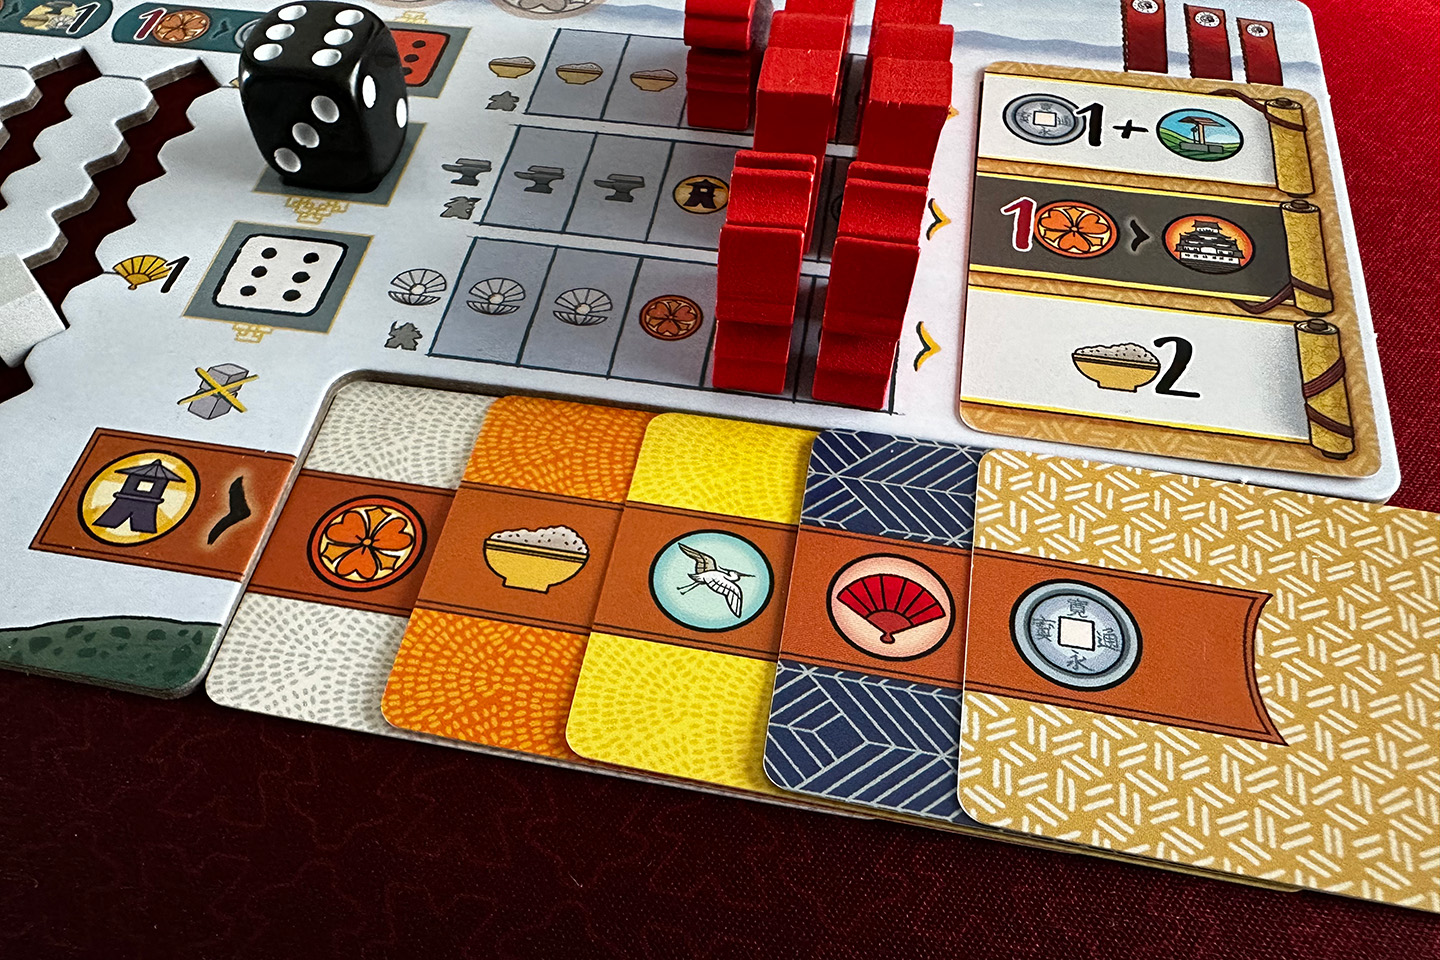
- Your player board. Your player board shows three action spots, one for each color die, and all showing value 6. So unless you manage to grab a die with value 6, you’ll be paying to place a die there. During setup, you place your three different units types—Gardeners, Courtiers and Warriors, five of each—next to these placement spots. By placing your units on the main game board, you uncover bonuses printed on your player board. When you place a die on one of the spots on your player board, you gain all the visible bonuses next to it. To the right of those bonuses and units you’ll also have an action card, the same type that is also in the castle on the main game board, and after you’ve taken the visible bonuses, you can also take the action on the card that lines up with the die you’ve placed.
I’ve mentioned the Gardener, Castle and Warrior actions a few times already now. Time to have a closer look at those!
- The Gardener action lets you move one of the gardeners from your player board to one of the six garden cards on the main game board, near the bridges. Each card shows three things: the amount of food you need to pay in order to place a gardener, the number of victory points you get at the end of the game when you have a gardener there and an action. You can execute this action at two moments: immediately when you place a gardener and at the end of rounds one and two, but only if there’s still at least one die on the bridge directly above the garden card.
- The Castle action lets you do two things. For two coins you get to move a courtier from your player board to the bottom of the castle on the main game board. For two/five mother of pearl you can move one of your courtiers in the castle one or two floors up. These floors of the castle are the same location where you get to place dice to execute the actions that line up with the dice tokens of the matching color. When one of your courtiers lands on a floor, you place it next to a dice placement spot, you get to take the action card and replace it with a new one. The action card you took goes to your player board and becomes the card you get to take an action from when you place a die on your player board. The first three workers that reach the top floor of the castle get to take a Lantern action (more on that later) and one of the three actions displayed on the card there, again, placed during setup. At the end of the game your courtiers in the castle score you one, three, six or ten points, depending on their location in the castle.
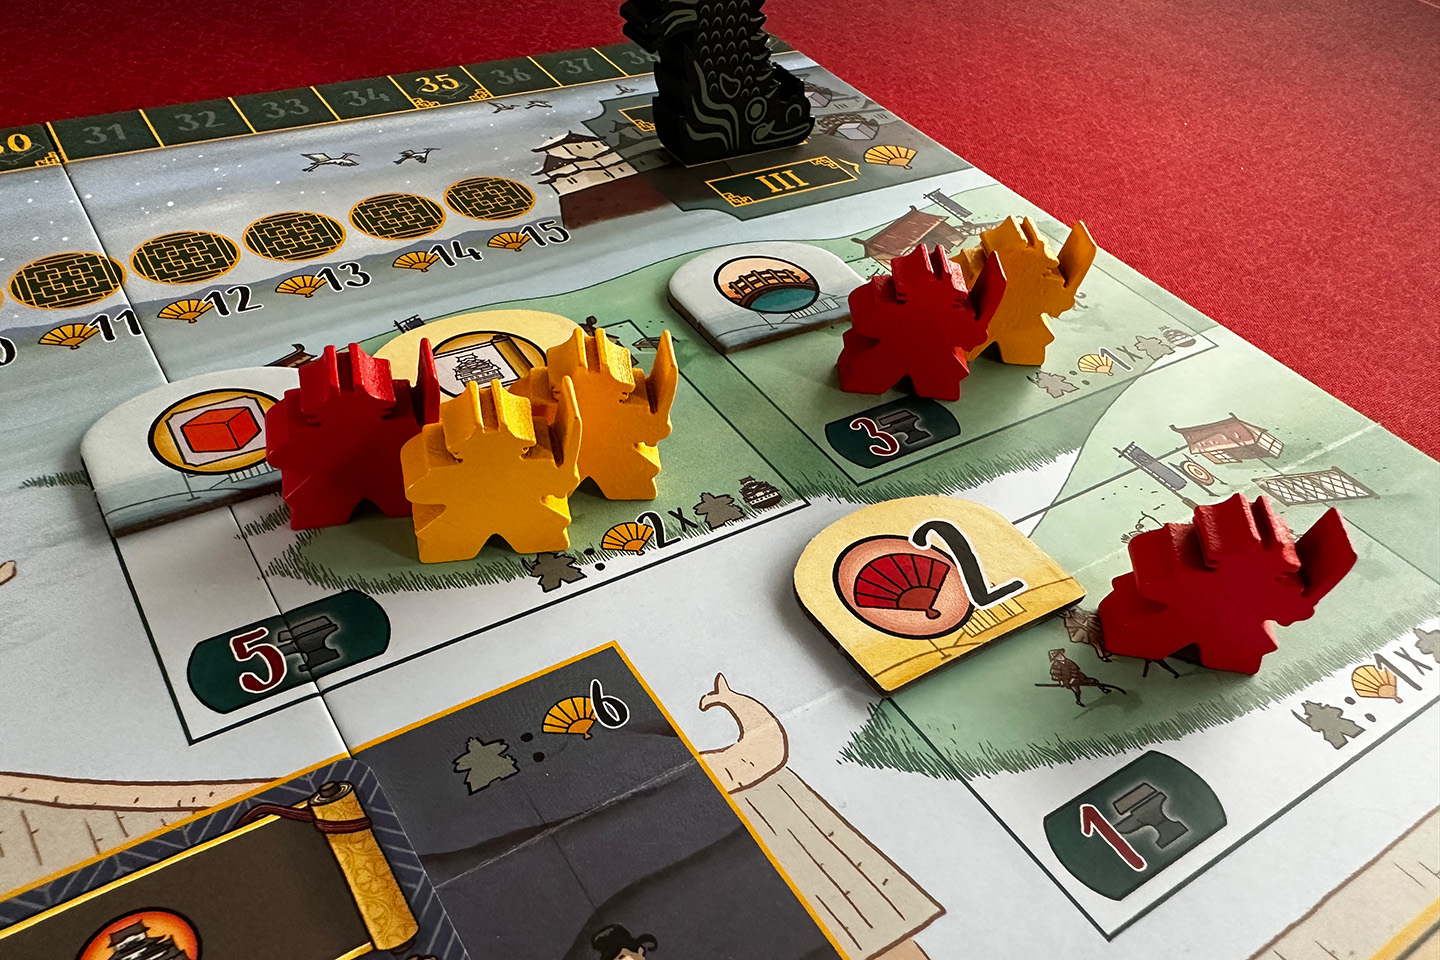
- The Warrior action lets you move one of the warriors from your player board to one of the three training grounds on the main game board. This will cost your five, three or one iron, depending on the training ground. Each training ground shows two things: one or two actions you can take when you place a warrior there and a multiplier. At the end of the game you add up all the multipliers and… errr… multiply that value with the amount of courtiers you have on level one, two or three of the castle. So warriors don’t score you points on their own, but they make your courtiers score more.
That leaves me only two more things to mention.
The first one is the Lantern action. There are a few things that let you take a Lantern action, but the most important one is taking the leftmost die of a bridge, as a sort of compensation because the dice on the left typically have a lower value. What the Lantern action does depends on your starting cards and the cards you might have collected from the castle by placing courtiers. Whenever you place a new action card on your player board, the previous one that was there goes face down next to your player board, slightly overlapping your starting cards and other cards there. All these cards show an icon of a resource, a coin, influence or immediate victory points. Whenever you take a Lantern action, you get to take everything visible on all the face down cards you have managed to acquire. Depending on your starting cards and which action cards you have collected, this will be a little bit different each game.
The second one is the influence track. Various actions might let you go up a space on this track. Besides giving you points at the end of the game based on how far you’ve managed to climb on the track, this track is also used to determine the turn order at the end of each round.
And that’s basically the entire game. After three rounds of three turns you tally up your points for the influence track and the gardeners, courtiers and warriors you have placed, and if you’re lucky, you might beat the AI.
How does the AI work?
When playing a solo game against the AI, nothing changes for you. Your turns go exactly the same as in a multiplayer game.
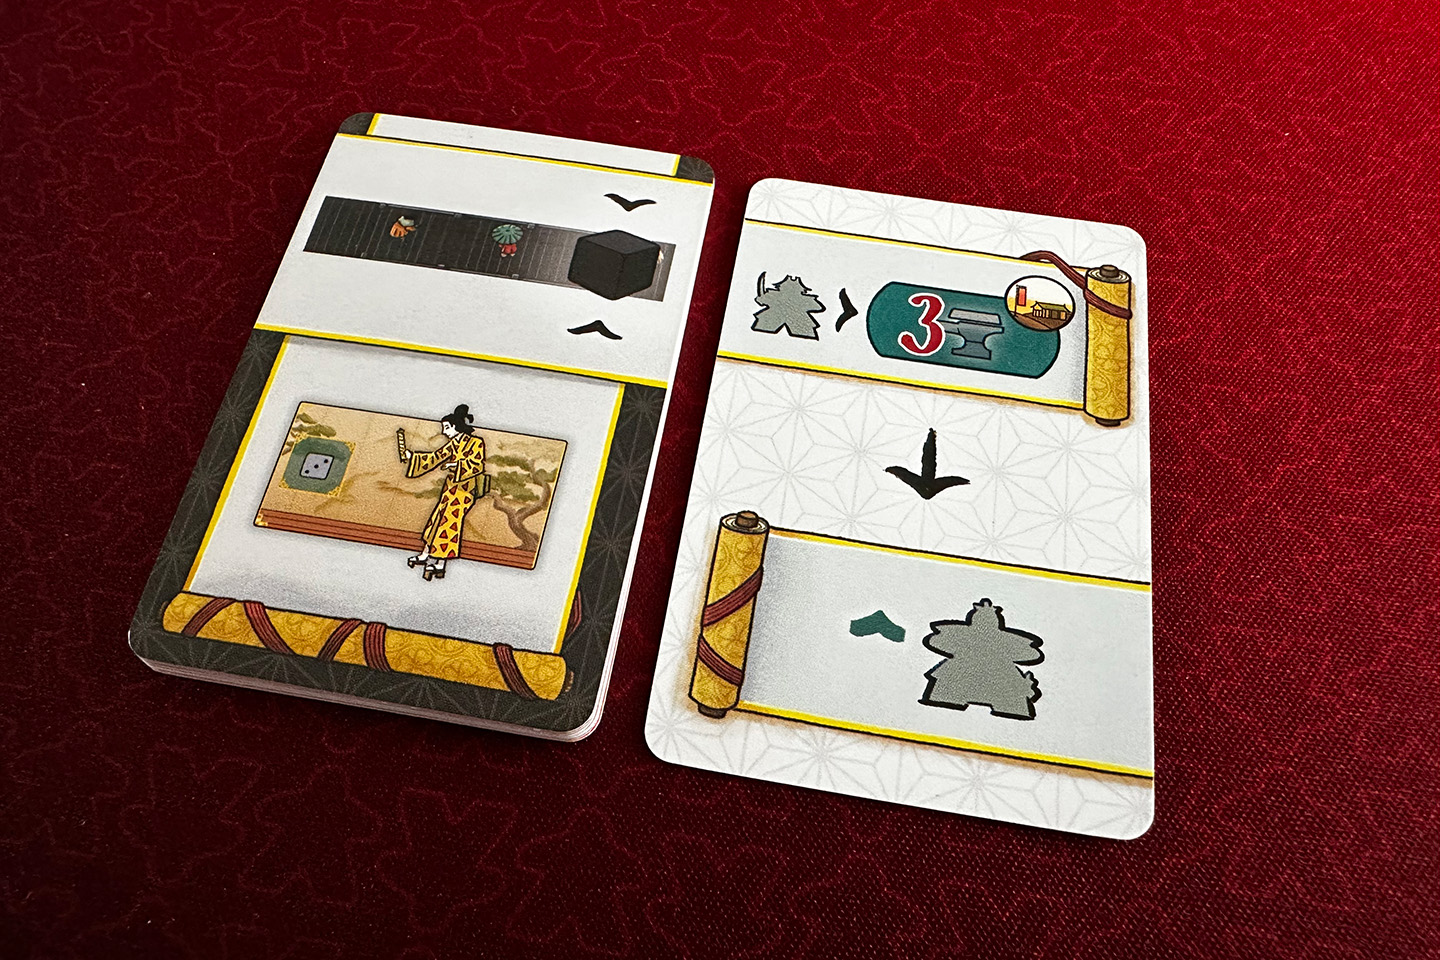
To control the AI, all you need is its deck of nine cards. When it’s the AI’s turn, you flip over the top card of its deck. The card that is now on top of the deck shows an image of a bridge (red, black or white) and a position of a die. If there is a die on that exact position on that particular bridge, the AI takes that die. If there’s no die on that position on that bridge, flip another card, place it next to the previously flipped card and check again. Repeat this until the AI has taken a die. To determine where the AI places the die, you look at the same card it used to select that die. The top of the card shows which die it takes, the bottom shows where it places that die. If that placement spot is already occupied by another die, the AI places the die at the well. The AI doesn’t need to pay coins to place a die with a lower value, but it does gain coins when it places one with a higher value. The AI also totally ignores the color of the die when placing it. If the AI selected a white die and the spot where it wants to place it only accepts red and black dice, the AI doesn’t care.
The AI ignores everything that’s on the board when it places a die. Instead, it looks at the card(s) you have flipped to let it select a die. Those cards all show two actions. If you only flipped one card, the AI only takes the two actions on that single card. If you flipped two or more cards, the AI only looks at the two rightmost cards and executes the actions on those cards.
The AI’s actions are very simple:
- Gain a number of coins, points and/or influence.
- Place a gardener on the garden card with the lowest number of points where it doesn’t have a gardener yet. The action indicates if you need to look at the left, right or all garden cards.
- Place a courtier at the ground floor of the castle.
- Move the bottom most courtier one or two levels up in the castle.
- Place a warrior in the indicated training ground.
If the AI ever needs to take an action that it can’t do, like moving up a courtier when it doesn’t have any in the castle, it instead gains points equal to the round number.
That’s basically it. Flip one or more cards to select and place a die and execute a few very simple actions.
At the end of a round, after the turn order for the next round has been established, the AI trades in as much of its coins as it can for points. It gets points equal to the round number per three or five coins it can turn in, based on whether it is first or second in turn order. So if it is first in turn order and has 10 coins at the end of the third round, it would get 9 points.
At the end of the first and second round, the AI also gets to activate its gardeners if there is at least one die on the corresponding bridge. Instead of taking the actions displayed on the garden cards, the AI gets points equal to the round number per gardener it can activate.
At the end of the game, the AI scores points in exactly the same way as you do.
What does it look and feel like?
The first thing you’ll notice when opening the box is that there are a lot of components in such a small box. You’ll be reminded of this every time you are packing things back up. Fitting everything back into the box is almost a game in and of itself.
The wooden components are very nicely shaped and detailed. I like how the gardeners, courtiers and warriors are very recognizable and chunky. Unfortunately every player color in my copy has at least one wooden component that’s slightly damaged somehow. The damage is only very minor and doesn’t affect gameplay in any way, but it is still noticeable damage.
The game board is quite big for coming in such a small box, which is good, because there is a lot of information on there, either directly or on the cards placed on the board. Because of its size it doesn’t feel crowded or too busy, but I can imagine that would have been the case had it been smaller. I like how everything is organized and illustrated. The only downside is the score track at the top of the board. You typically don’t score a lot of points during the game and the part you’ll be needing the most—let’s say the 3–8 points area—is very hard to see because of the big player turn markers right in front of it. Those herons are really quite big and obscure your view of the left part of the score track. I don’t place those herons on the board anymore.
The cardboard bridges are a nice touch, but I also don’t bother placing them on the board anymore. I leave them in the box and just use the bridges printed on the board. Saves me some time from constantly having to reposition the bridges after having bumped them a bit when taking or moving a die. You’ll likely won’t be bothered by this, but personally, I can’t stand things like that being a few millimeters out of position.
The player boards have handy cut outs to keep the resource tracking in place. As someone who can’t stand things being a few millimeters off, I really appreciate this!
The cards are basic, but OK. Because they only get shuffled once, at the start of the game, I don’t bother sleeving them.
How much time does it take?
Setting up the game takes me about 7 minutes. Because there are only nine turns for both you and the AI and because those of the AI have very little overhead, a solo game is easily playable in 30–40 minutes.
I think after a few games, once you’ve familiarized yourself with the iconography and the different actions you can take, you can probably go from grabbing the box to putting it back away in about 45–50 minutes.
What is my verdict?
There is a lot to like in this game. For starters there is a lot of variability:
- Random garden cards placed during setup.
- Random actions cards placed in the castle during setup.
- Random dice tiles placed during setup limiting which dice can be placed where.
- Random reward tokens placed in the training grounds.
- Random starting cards.
- Random lantern actions based on what you do during the game.
So while you’re trying to do the same thing each and every game (placing as many gardeners, courtiers and warriors as you can on the board), how you have to approach and accomplish that is vastly different from game to game. Sometimes you’ll be able to place all your warriors, sometimes that’ll be a real struggle, either because of a lack of iron or because of a lack of Warrior actions. This keeps the puzzle fresh and interesting. I’ve played the game 12 times now, and I’m not even close to having a feeling I can just autopilot it.
Another thing I like is how you only have nine turns in total but you can still get a lot done because of how a lot of actions allow you to combo things together. If you prepare well enough for that. You can, for example, place a gardener on a garden that lets you take a Castle action for three coins. Via that castle action you place a courtier and move another one up two levels. You take the card the courtier ends up on, place it on your player board and you get to execute one of the light colored actions on it: a Warrior action. You place a warrior in a training ground and the reward is that you can take any action on the board associated with a red dice token. You choose the action showing the well icon, letting you take the well action to gain two Daimyo Seals and an influence. That is a big turn, but you need the food to place the gardener, the coins to execute the action on the garden card, the coins to place a courtier, the mother of pearl to move a courtier up and the iron to place a warrior. Given how tight resources can be in this game, you really have to plan for such turns. And even then you can’t be sure you’ll be able to pull it off, because while you’re preparing, the AI might place a die on that action spot you need to kick it all off, or swap out the action card you were going to take with your courtier. So you need some planning, preparation and luck, but if you can pull it off it feels very rewarding.
What I also like is how snappy the AI turns are. No complicated flow charts. Just flipping cards and doing simple actions.
Unfortunately, there are also things that make me like The White Castle less as a solo game. Most of it comes down to how unbalanced the AI feels. I’ve played it solo 11 times, and I haven’t won a single game. In fact, I haven’t even gotten close. The AI’s average score is higher than my top score. One of the main reasons is that while there are only very few opportunities for you to score points during the game, the AI really racks up points. At the end of round one it scores 1 point per 3 or 5 coins it can trade in and per gardener it can activate. At the end of round 2 it scores 2 points per 3 or 5 coins it can trade in and per gardener it can activate. At the end of round 3 it doesn’t score any points for its gardeners, but it does score 3 points per 3 or 5 coins it can trade in. It can’t take an action? That’s another 1, 2 or 3 points. It can’t take a die? Twice as many actions to take! I think I have about 5 points on average before end game scoring while the AI easily gets 25 points on average. Since end game scoring follows the same rules for you and the AI, you need to be able to outscore the AI in endgame scoring by at least 20 points, on average. Given how many double actions the AI gets to take, that’s virtually impossible. I’ve heard other people say they managed to win from the AI, but almost every time they add that the AI got unlucky with how little coins it got to collect or how few double actions it got to take.
I don’t mind losing at all, I really don’t. But when you haven’t come close on the easiest difficulty setting in 11 games, it becomes pretty frustrating. Especially because it has nothing to do with how well you are playing and because there seems to be very little you can do to influence the AI.
I’ve thought about not letting the AI score and turning it into a BYOS—beat your own score—game, but because of how much impact the variable setup has on the scoring potential, that makes very little sense. Sometimes you’re scoring in the 40s, other times you’re scoring in the 60s. Nothing you can do about it.
After those 11 solo games I played a two player game against a friend and I really enjoyed that one a lot more. So for me, The White Castle is a very fun game, but a very frustrating solo game. I might keep it around to play with other people, but I doubt I’ll be playing it solo again.
Score
To make things easier for myself, I use the same scoring categories Board Game Geek uses.
Comments
I'm sorry, I don't support comments on my website. If you want to discuss the game or my review, feel free comment on this dedicated Instagram post or my review on BGG.