Nucleum - A Solo Review
14 Feb 2024, reviewed by Kristof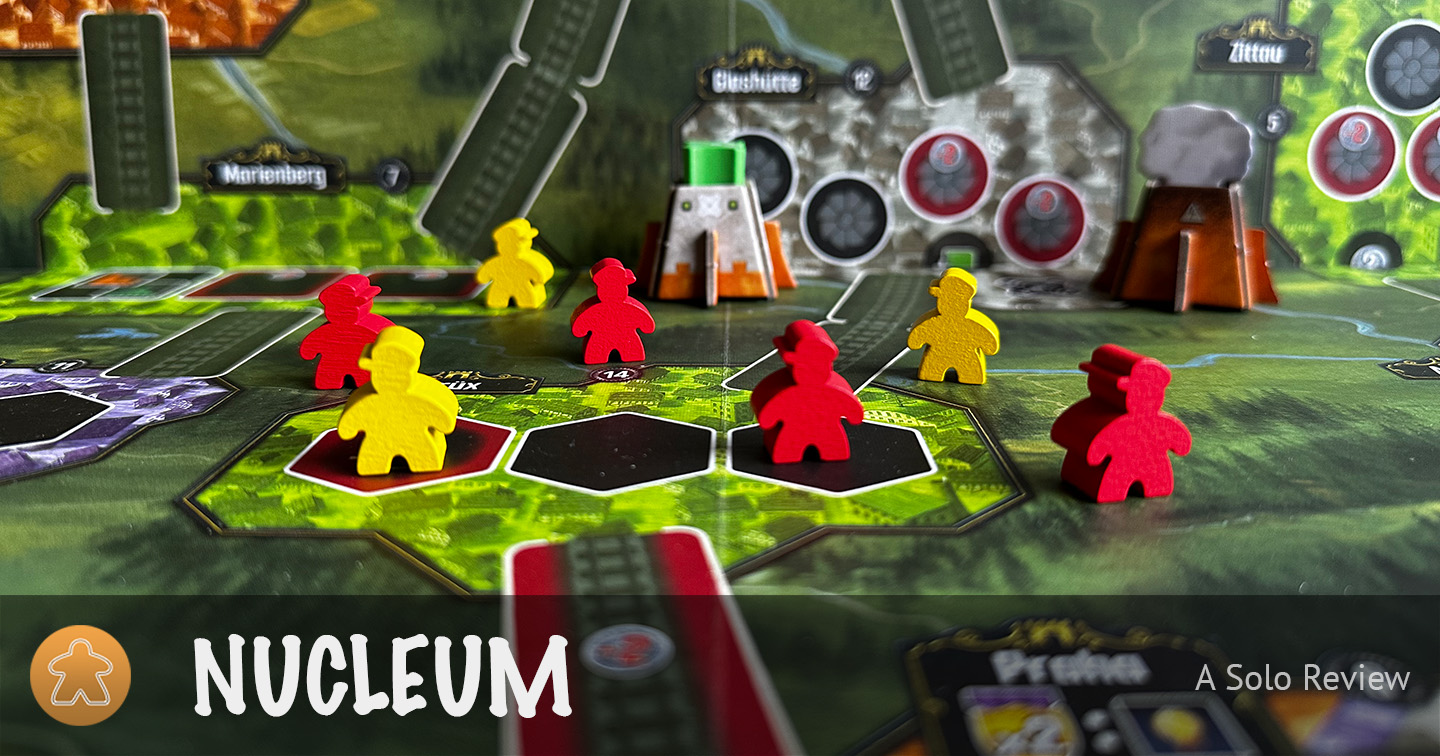
Saxony, 19th century. The recent discovery of nuclear energy has led to the rise of uranium powered power plants called Nucleums. The booming industry is demanding more and more energy. Will you become the most successful industrialist by building out a network of railways to transport uranium and coal to power plants and electricity to the buildings waiting to be energized?
Name: Nucleum
Designer: Simone Luciani and Dávid Turczi
Solo designers: Dávid Turczi
Publisher: Board & Dice
Game type: action selection, network and route building
What is Nucleum?
Nucleum takes place in an alternate history version of 19th-century Europe, in a country called Saxony, about a generation after the rise of nuclear energy. The technological advancements, driven by the nuclear reactors called Nucleums, only call for more of these Nucleums to be built. And of course efficient ways to transport uranium—and if that fails good old coal—to the power plants.
In Nucleum you take on the role of an industrialist securing contracts and building out a railway network to transport uranium and coal to power plants to deliver electricity to the urban buildings you’ve constructed in order to energize then.
In the solo game you’ll compete against Baron von Automat. Whoever has the most victory points and the end of the game is declared the winner.
How does it play?
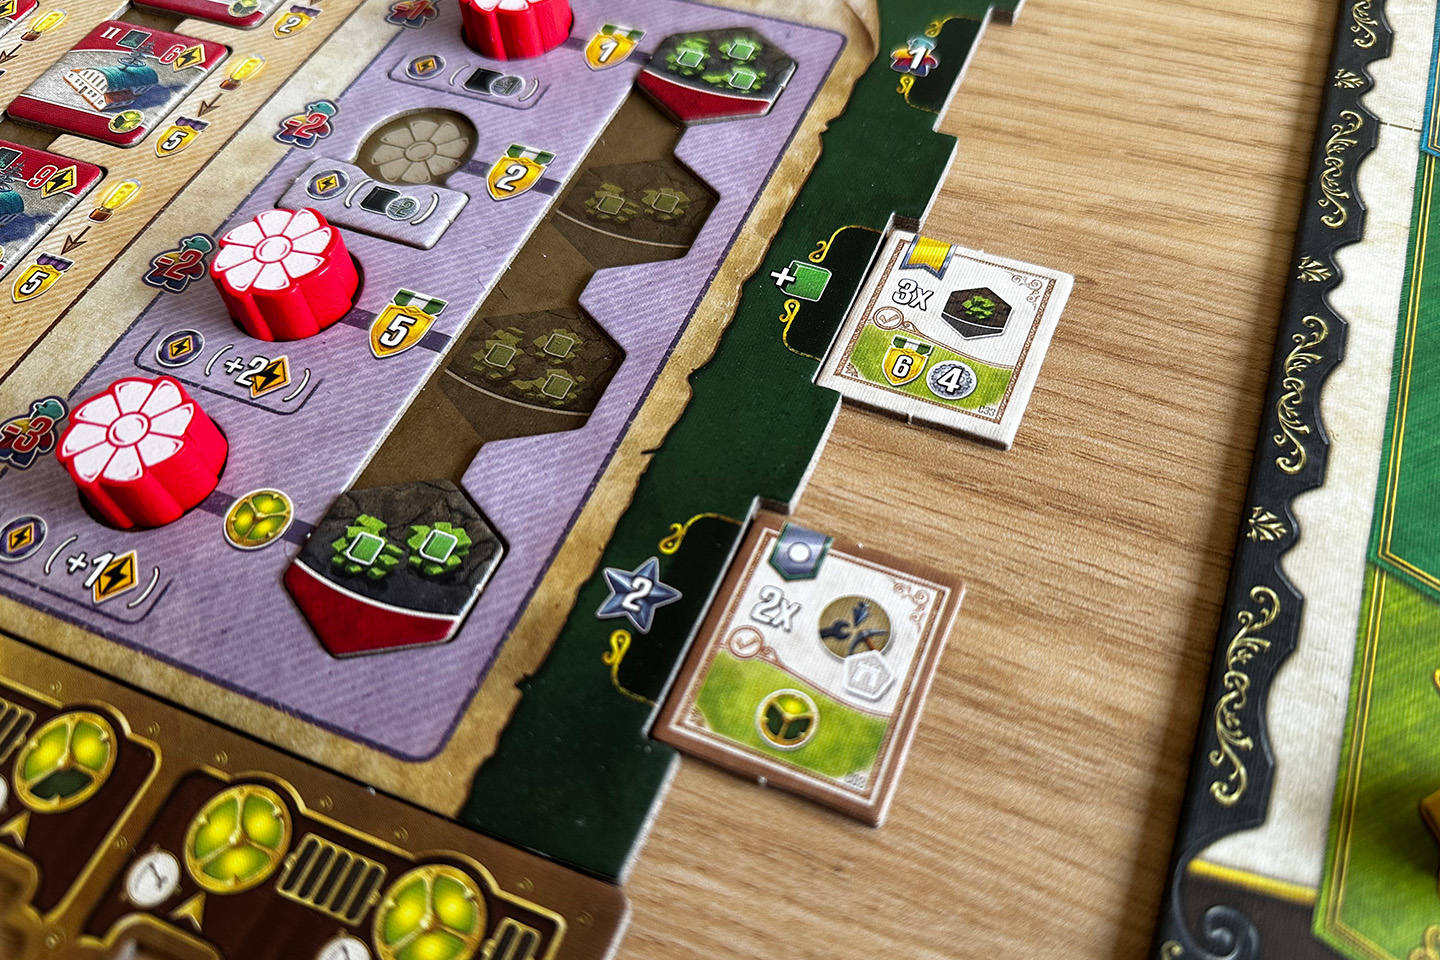
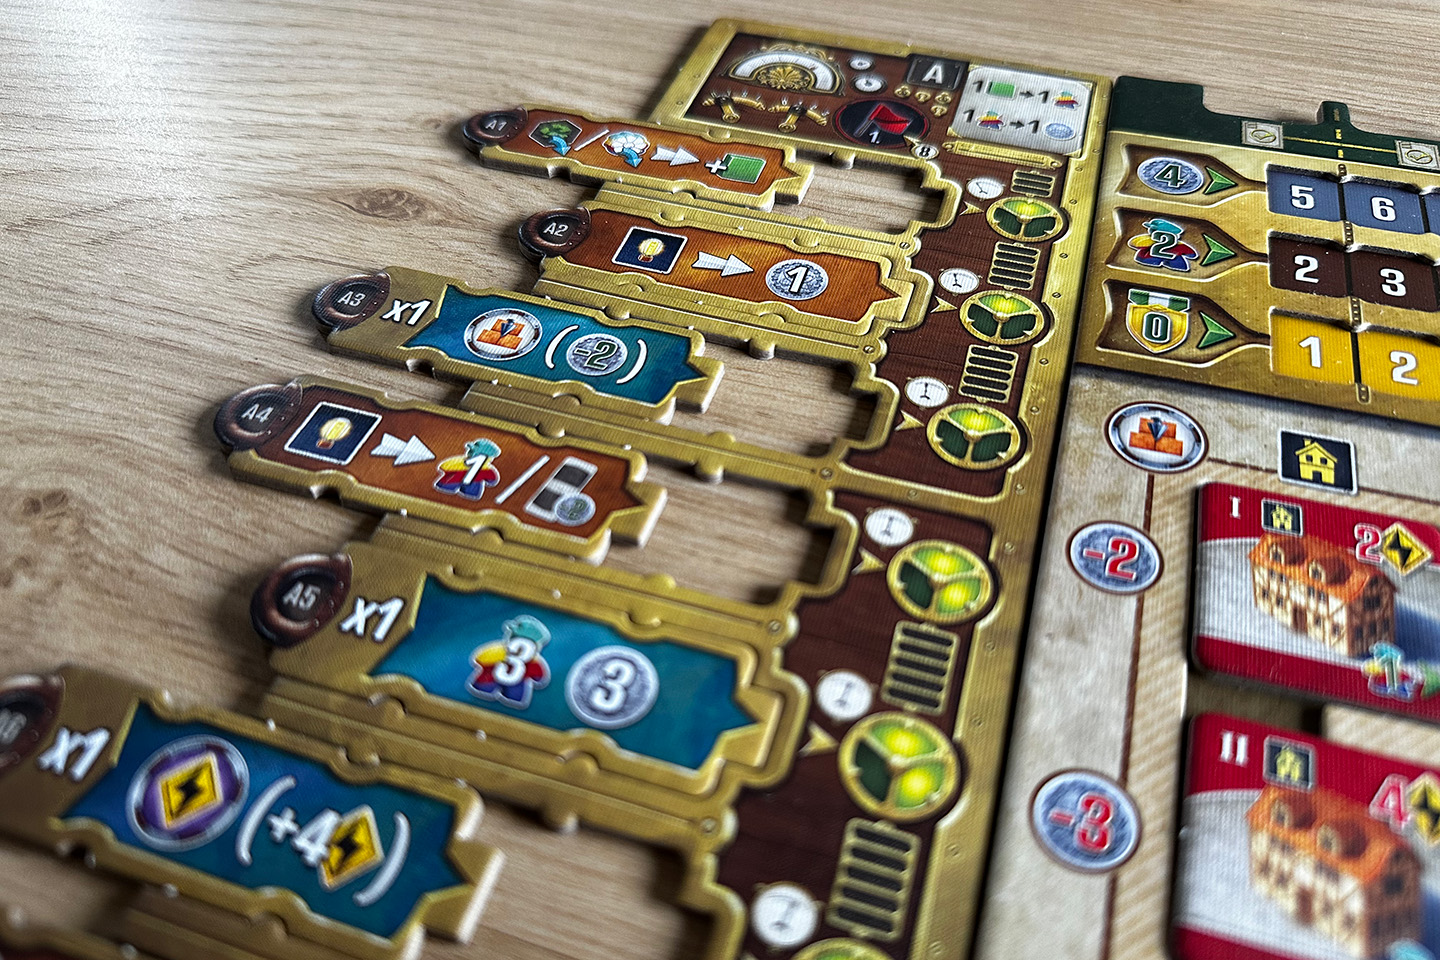
After setting up the main game board and your player board—which takes quite some time—you have to choose one of the four so called experiments labeled A, B, C and D. These experiments are a combination of eight technology tiles and a handful of action tiles that are different for each experiment, giving you some asymmetry to play around with. The technology tiles represent either ongoing abilities or benefits, one-time immediate rewards, or extra scoring conditions. They’re disabled at the start of the game, but during the game there are various ways to unlock them. The action tiles on the other hand have the icons of two actions printed on them, one on each end, along with a colored edge. Most of your turns, you’ll be playing such an action tile and that’s where the icons and the colored edges will matter.
On your turn you have to pick one of three available options.
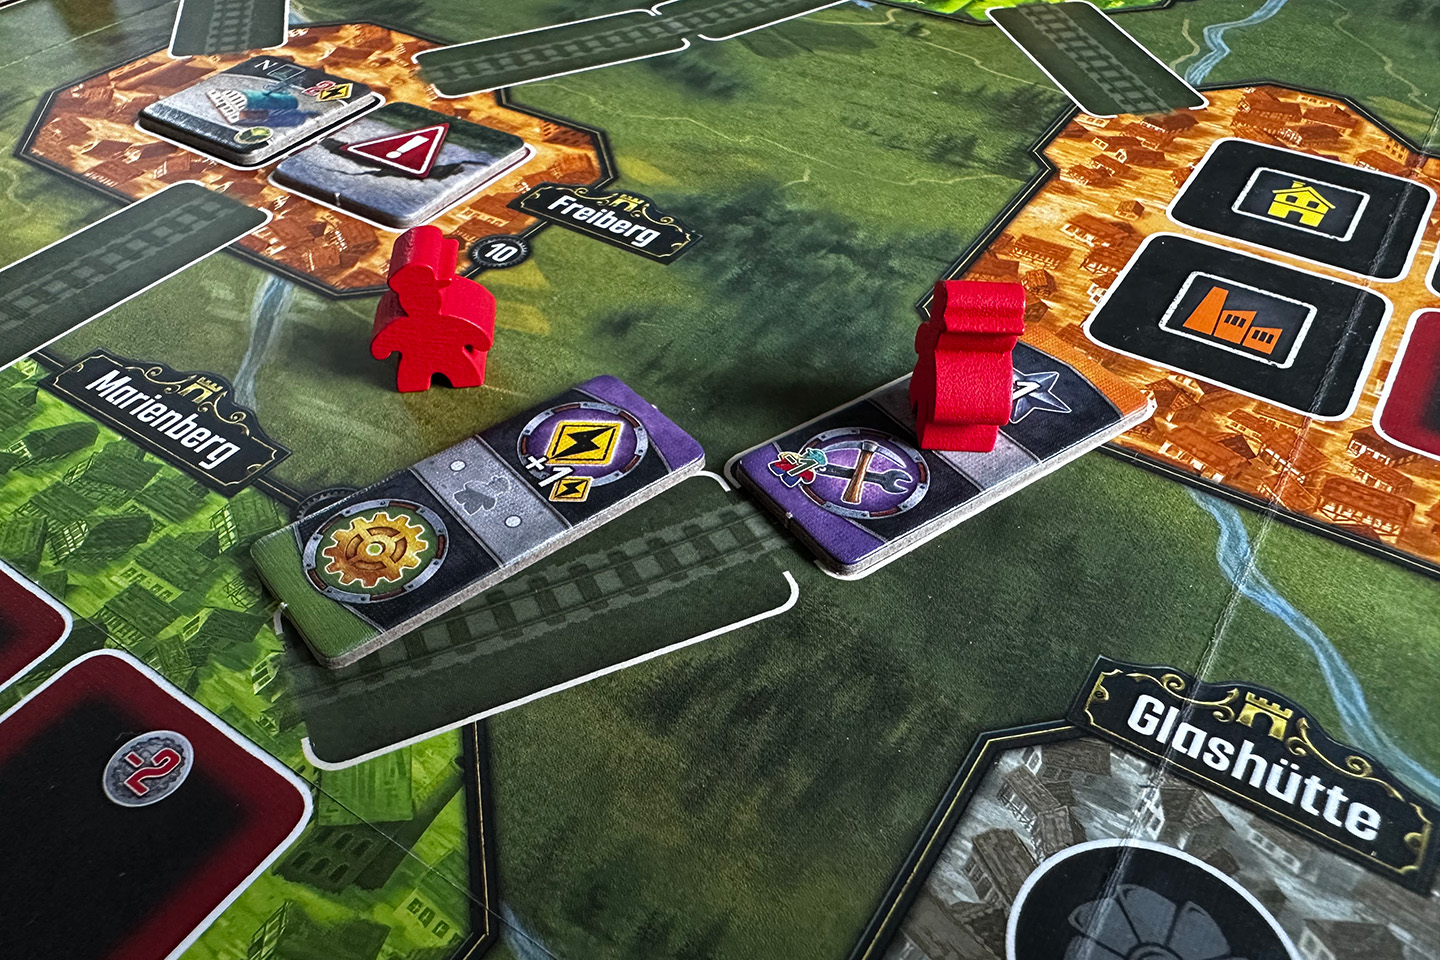
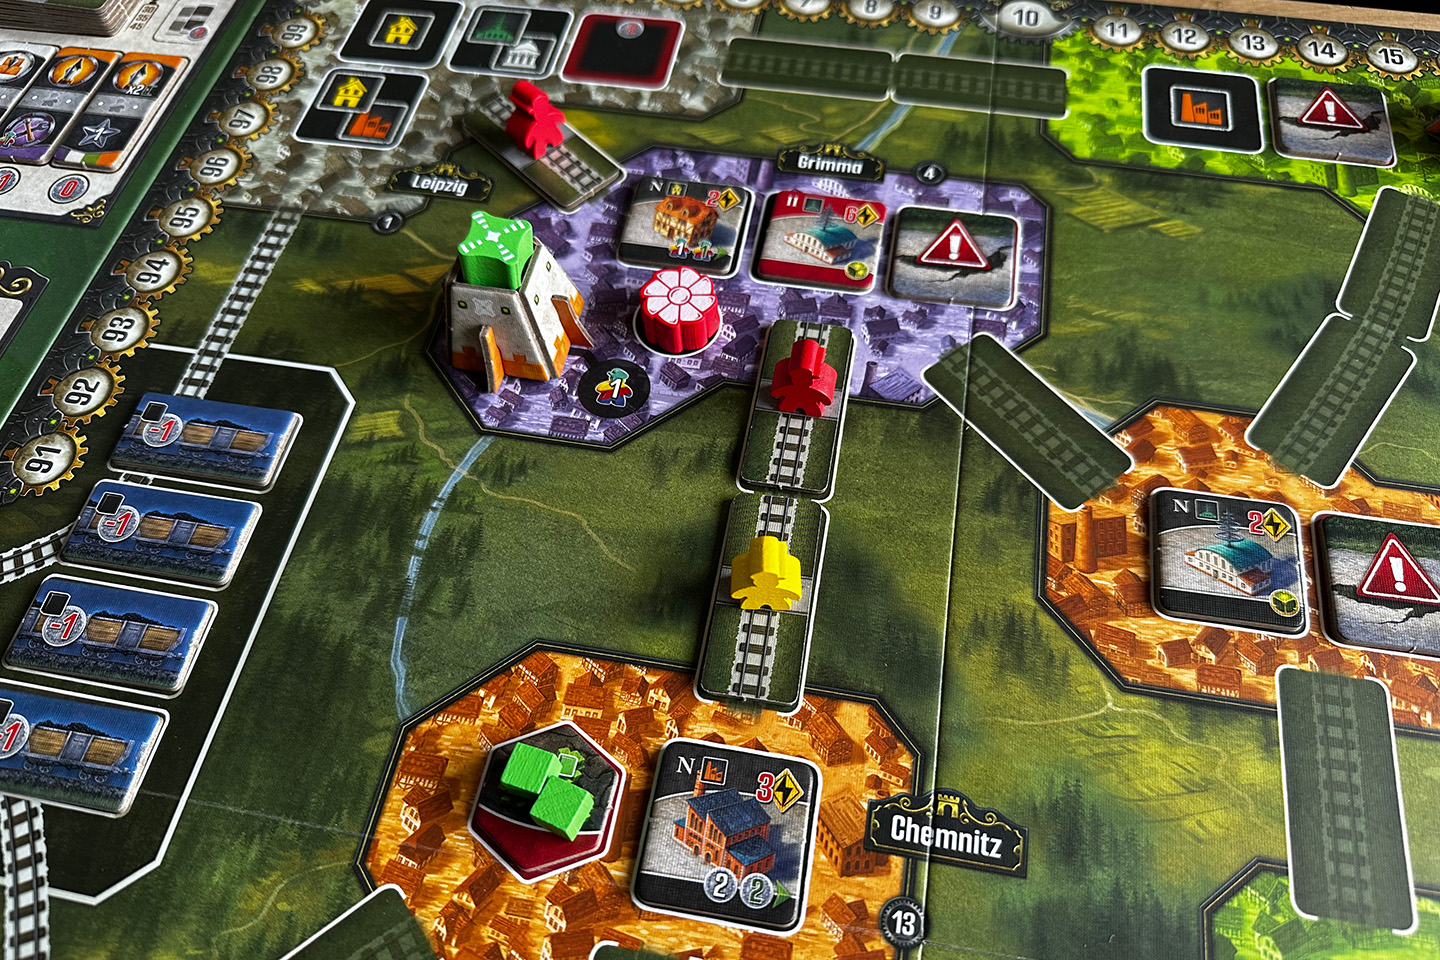
The first option is placing one of your action tiles on a railway spot on the map and put one of your workers on the tile to indicate you own it. You can place your tile anywhere you want, as long as one side of the tile connects to either another railway tile or to a city on the map. After you’ve placed your tile, you can execute the actions on it, but only if the colored edge next to the action matches the color of the tile or city it is connected to. Additionally, if a placed tile has a color match with another tile, the owner of that tile can also execute the action on their tile. If you’re the owner of both tiles, you’re in luck as you get to execute all actions yourself! If the tile you placed completed the railway line (they come in sizes of either one or two tiles), you turn over all tiles in the line. Completing a railway line of more than one tile also gives all owners of tiles in that line a bonus in the form of advancements on the victory points income track which gets triggered during recharge turns.
The second option is placing one of your action tiles in the leftmost empty slot at the top of your player board. When you do this, you can ignore the colored edges of the tile and just execute both actions. In addition to taking the actions on the tile, when you place a tile at the top of your player board you also have to option to fulfill a contract, either one of the gold or silver contracts you have acquired and placed in one of the four slots on the right of your player board, or one of the three purple contracts on the main game board. Each contract tile shows a requirement you need to meet (e.g. have 8 railway tiles, have built all your turbines, …) and a reward you get for fulfilling it, the most interesting one being the chance to unlock one of your technology tiles.
The third and final option is taking a recharge turn. When you can’t or don’t want to place an action tile, you can take a recharge turn. A few things happen during a recharge turn.
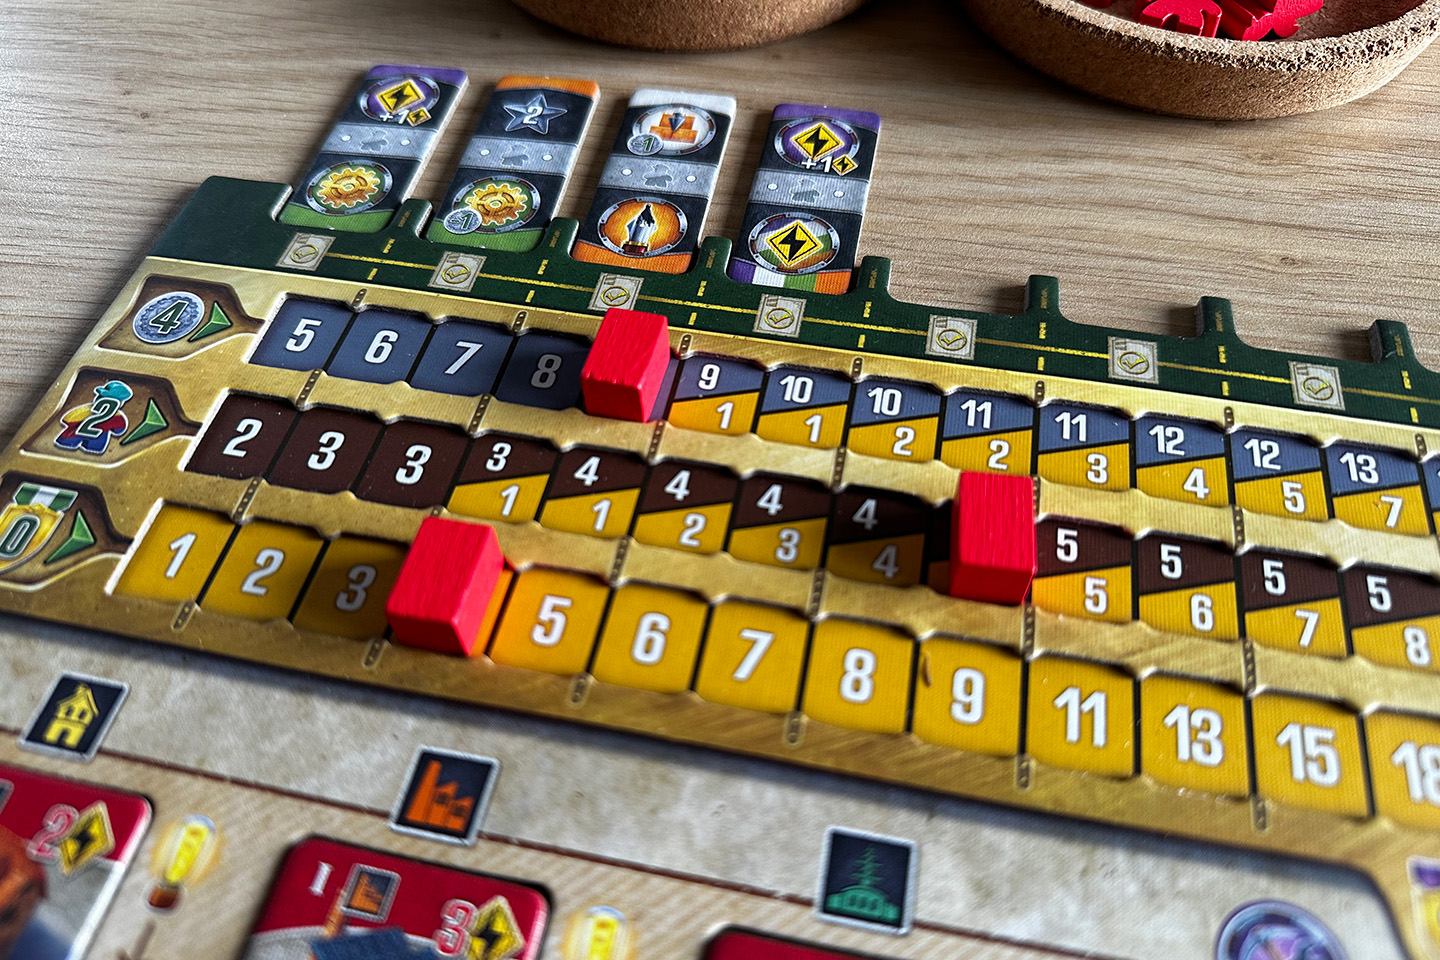
- Take income. There are three income tracks on your player board. One for coins, one for workers and one for victory points. Each track has a marker you can advance in various ways during the game. The action tiles you place at the top of your player board line up with the income tracks. The income you gain (coins, workers, and/or victory points) is the highest value that is both to the left of the marker on the respective income track and underneath an action tile. So even if you’ve advanced the income markers all the way to the right, if you’ve only played one action tile, you’ll only get the income below that action tile. But on the other hand, if you have seven action tiles above you’re player board, but you’ve only advanced the markers three places, your income is limited to the value on the second place, directly to the left of the markers.
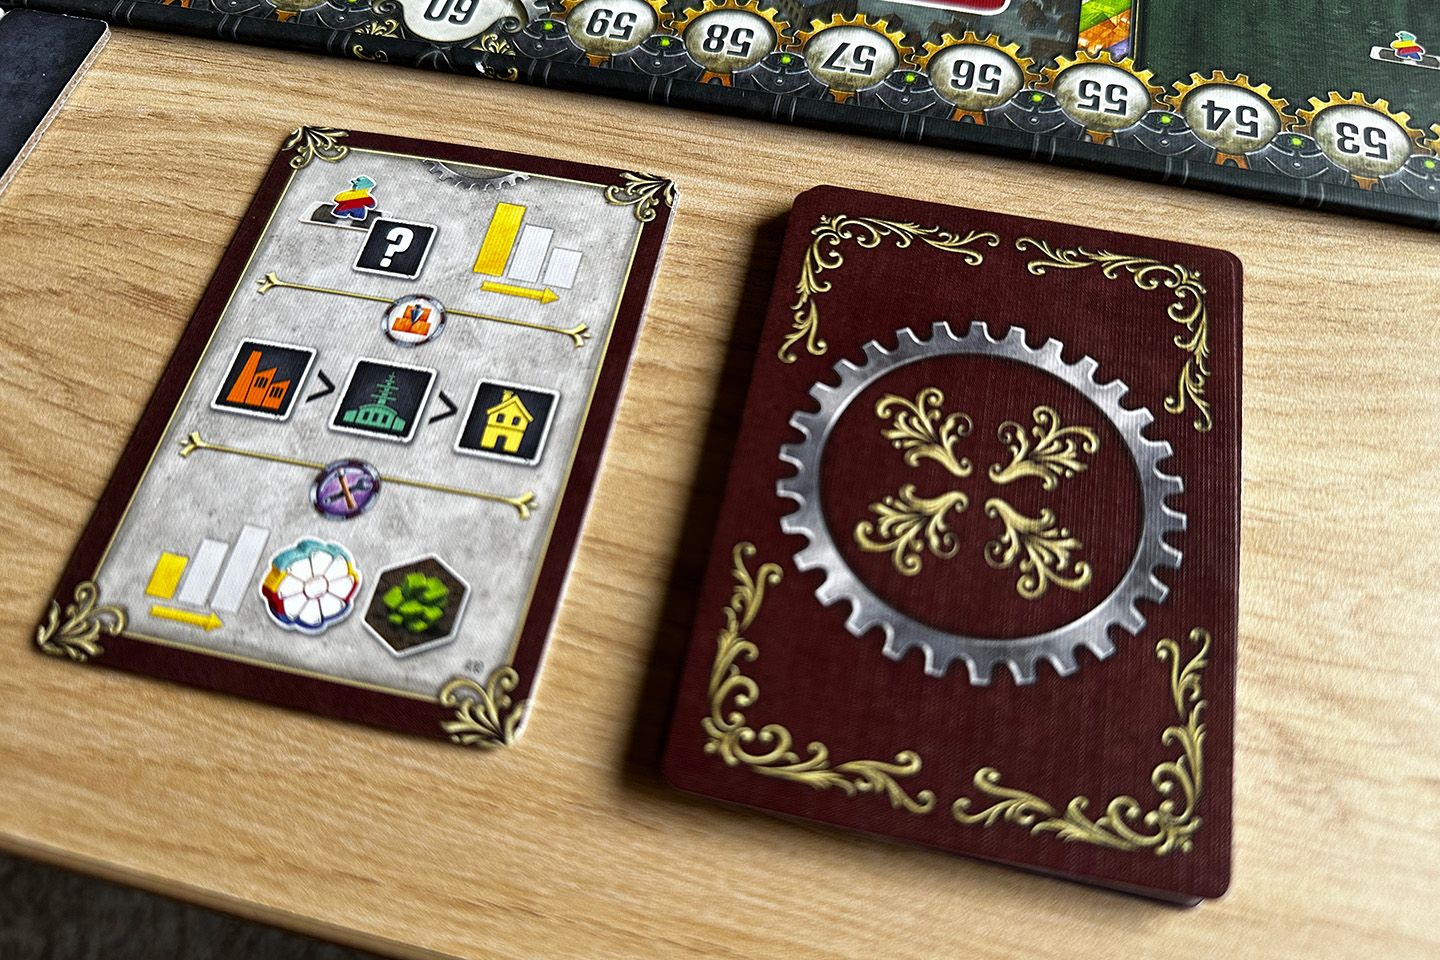
- Place a milestone marker on the milestone track on the game board. At the start of the game you placed four random milestone tiles on the milestone track. These milestone tiles determine for which things you will be able to get points at the end of the game, e.g. points for every residential building you’ve built, points for every two railway tiles you’ve placed on the board or points for every city in which you have an energized building. The milestone track is divided into four different segments, one for each milestone tile. The milestone track is also divided into six tiers of different colors. The tiers can overlap the segments. All along the milestone track are achievement spaces of increasing value. You can place one of your milestone markers (a wooden token in the shape of a star) on one of those achievement spaces, if you have achievement tokens—which you can earn in various ways during your turns—equal to the value of the space you want to place a star on. Additionally, you can only have one star token per tier (color), but you can have multiple per segment. At the end of the game your stars will act as multipliers for the scoring condition of the segment you’ve placed them in. Each segment also contains a nucleum token. If you’re the first to place a token in a segment, you can take the nucleum token, place it one of the power plants that doesn’t have one yet and gain the benefit associated with that power plant (e.g. an extra worker or a uranium). That power plant can now also process uranium instead of only coal.

- Discard all leftover achievement tokens. This means you’ll have to start from scratch to gain achievement tokens to place your next milestone marker during your next recharge turn.
- Retrieve all action tiles from the top of your player board.
- Perform king’s day scoring if necessary. This happens when all players have placed one, two or three star tokens on the milestone track. The owner of the highest placed star gets 6 VP, the owner of the second highest placed star gets 2 VP.
As you can see, a recharge turn lets you take back the action tiles you played to the top of your player board, but the ones you played to the game board as railways stay there; they are never coming back to you. So why, apart from the extra actions you could trigger from color matches, would you “give up” tiles by placing them as railways? Well, you need to have cities, where you can build your urban buildings, mines and turbines, connected to each other so you can transport uranium and coal to power plants, and energy from those power plants to your buildings. While it doesn’t matter who owns a railway when transporting things, you can’t just rely on other people’s railways, because building railways is also an important way to expand your networks. (The action tiles you start the game with also contain a special directive tile. This tile only has one action, but it can be any action you want, kind of like a wild card. You can’t place this tile as a railway. It is there to give you some extra flexibility and to prevent you from accidentally running out of a certain action.)
A network is a very important concept in the game, so let’s take a moment to understand it. A network is defined as a grouping of one or more cities connected with each other by completed railway lines. A city belongs to your network if either: it is adjacent to your railway or is connected to a completed rail line with at least one railway you own or contains your building.
So basically a city belongs to your network if one or more of these conditions is true:
- The city contains on of your urban buildings, turbines or mines;
- One of your railway tiles is directly connected to the city;
- A completed railway line where you own at least one part is connected to the city.
You can have multiple networks and when you connect your networks via a railway line of which you own at least one tile, they join together in one network.
The concept of a network is important because you can only build buildings, turbines and mines in cities that are part of one of your networks. (Except at the start of the game, when you don’t have a network yet.)
Now that we’ve gone over the general turn structure and the concept of networks it’s time to talk a bit about the different actions you can take via your action tiles. There are five main actions and a group of things called subsidize actions.
The main actions are:
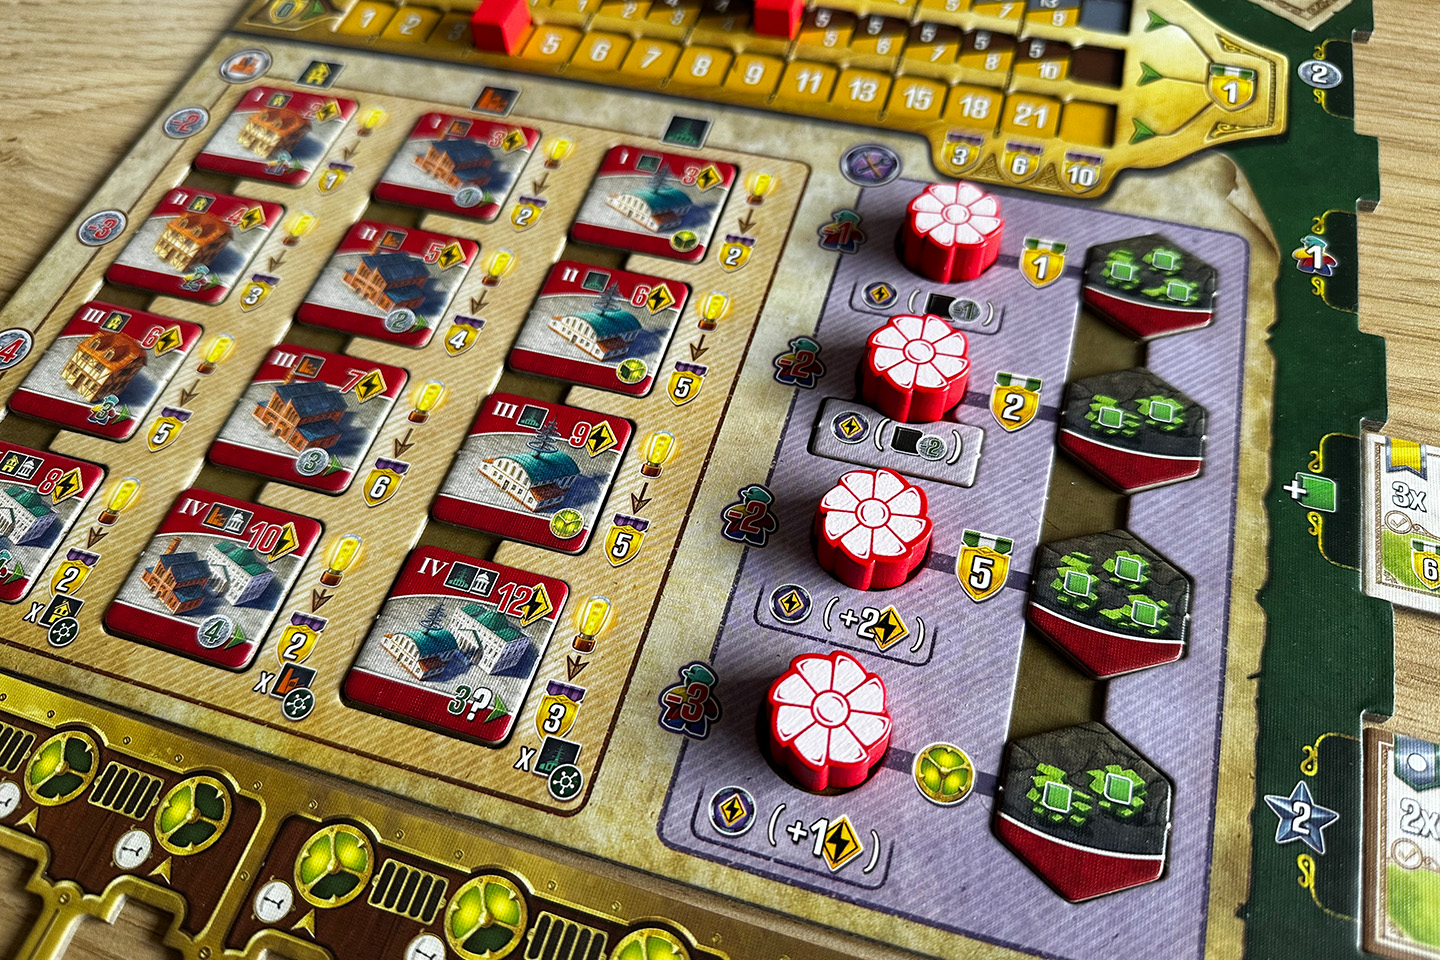
- Urbanize. Your player board contains 12 urban building tiles divided into three types (residences, factories and laboratories) and four levels (I, II, III and IV). The urbanize action lets you place one of your urban buildings onto a building spot, one that matches the category of the building, in one of the cities in your network. Placing a building will cost you coins; the higher the level, the more coins you’ll need to pay.
- Industrialize. You player board also contains four pairs of turbines and mines. The industrialize action lets you place either a turbine or a mine on a valid spot in one of the cities in your network. Placing a turbine unlocks an ongoing ability indicated on its spot on your player board. Placing both turbine and mine of a pair gives you immediate victory points or lets you unlock a level 3 technology. Mines are used to store your uranium. They can hold two or three uranium tokens. Turbines are used to make power plants with a nucleum token process more uranium.
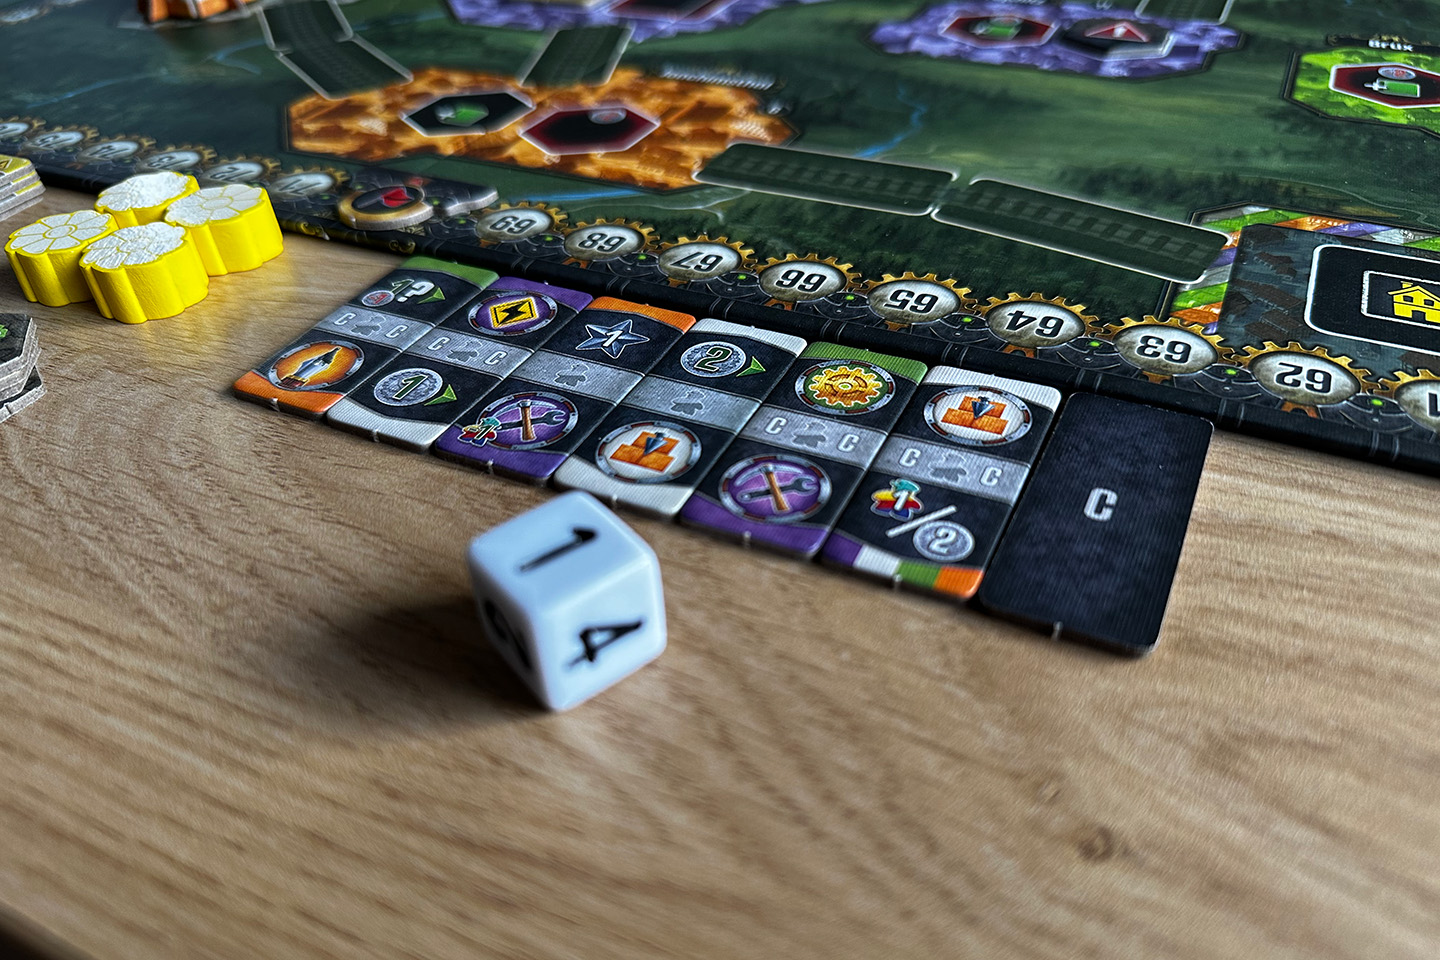
- Develop. This is the only way to gain new action tiles. Taking this action lets you buy up to two tiles from the market, which shows a selection of five tiles. After you’ve bought tiles, you slide the remaining tiles to the right and fill the open spots on the left with new ones.
- Contract. This action lets you take one of the silver or gold contracts from the contract market on the game board, refilling it afterwards. Taking a contract doesn’t cost you anything, but you need to have the place to store it. Your player board has room for four contracts on the right side. When you place a contract in one of the slots you also gain the reward associated with that slot (2 coins, 1 worker, a uranium or 2 achievement tokens). When you later fulfill a contract you remove it from your player board, freeing up the slot for a new contract.
- Energize. This action is all about bringing energy to one of your or one of the neutral buildings. Each building shows an energy requirement. The building needs to be connected via a finished railway to a power plant and there needs to be at least one finished railway between that power plant and energy sources: one of the two locations on the board that has coal for sale (at increasing prices as coal runs out), or one or more of your mines with uranium on it. (All power plants can process coal, only power plants with a nucleum can process uranium.) Coal generates one energy, uranium generates two energy, but the amount of uranium a power plant can process is limited by the number of turbines next to it. If you can deliver enough energy to a building tile, you get to flip it and gain the energy value in achievement tokens (used to pay for placing star tokens on the milestone track) and any other reward shown on the tile (e.g. workers, coins, …).
Next to those main actions there seven subsidize actions. These action all let you gain something: workers, coins, achievement tokens or advancement on one of the three income tracks.
And that’s basically it! You go on taking turns until one of the two end game conditions are met. In the solo game these are:
- The solo opponent has taken three recharge turns;
- Two of these four conditions are met: the three action tile draw piles are empty, both the silver and gold contract draw stacks are empty, you have unlocked all of eight of your technologies, you have reached 70 VP.
Once the end of the game is triggered, the current round is finished and everyone gets one additional turn. After that, the final scoring is done. You get points for the following things: the milestones on the milestone track based on where you have placed your stars, your final technology tile if you have unlocked it, leftover resources (workers, coins and uranium in your mines), your energized buildings and scoring bonuses on the income tracks.
How does the AI work?
In the solo mode you compete against an opponent called Baron von Automat.
Just like you get to pick one of the four experiments for yourself at the start of the game, you also pick one for the Baron. The Baron doesn’t need the experiment board or the technology tiles though, it only needs the starting action tiles along with two random general action tiles.
The Baron’s six action tiles get placed in a face up row in a random order, with the special directive tile, which functions as a stopblock, tile at the right. When it’s the Baron’s turn, you roll its special die (with values 1,1,2,2,3,4). The value tells you which action tile from its queue it wants to use. If it points to the stopblock or a tile to the right of it, simply take the tile immediately to the left of the stopblock. Then you have to decide if the Baron is going to place the tile on the board as a railway tile or if it is going to use it purely for the actions, in which case tile goes to the back of the queue after resolving the actions. The rule is pretty simple: if both actions on the tile are present on at least one other tile in its queue of actions tiles, it’ll place it as a railway tile; the Baron never gets rid of a tile (by placing it on the game board) if that would make it run of an action on its tiles. The separate solo rulebook contains four checks you need to make to determine where the Baron would place a tile on the game board. Regardless of whether the tile is used as a railway or purely for the actions, the Baron always executes as much actions as possible and always in a specific order.
Whenever the Baron has multiple options when executing an action, like which building to build and where to place it when urbanizing, or whether to build a turbine or a mine and where to place it when industrializing, you need to flip one of the Baron’s decision cards. Each card shows tie breakers for every possible decision.
If the Baron would start its turn without coins and workers, or with the stopblock being the leftmost one in the queue, it will take a recharge turn. Recharging for the Baron means it gets four coins and three workers from its supply, the stopblock goes back to the rightmost place in the action tile queue and it places one of its three star tokens six spaces above its highest star token on the milestone track. The Baron’s star tokens don’t really matter for end game scoring, only for the intermediate king’s day scoring (where the two highest stars give their owners 6 and 2 VP).
Scoring at the end of the game is a little bit different for the Baron. It scores its energized buildings just like you, but it gets fixed points for the milestones: 2, 4, 6 and 8 VP for each time it meets the four milestones, from bottom to top respectively. It also scores 1 point for remaining coins and workers.
Whoever has the most points at the end of the game wins.
If you want to spice things up, there are two ways to do that:
- You can add in one or more of the ten extra challenge modifiers you can find in the rulebook;
- You can add a second Baron opponent and play a three player game on the backside of the game board.
What does it look and feel like?
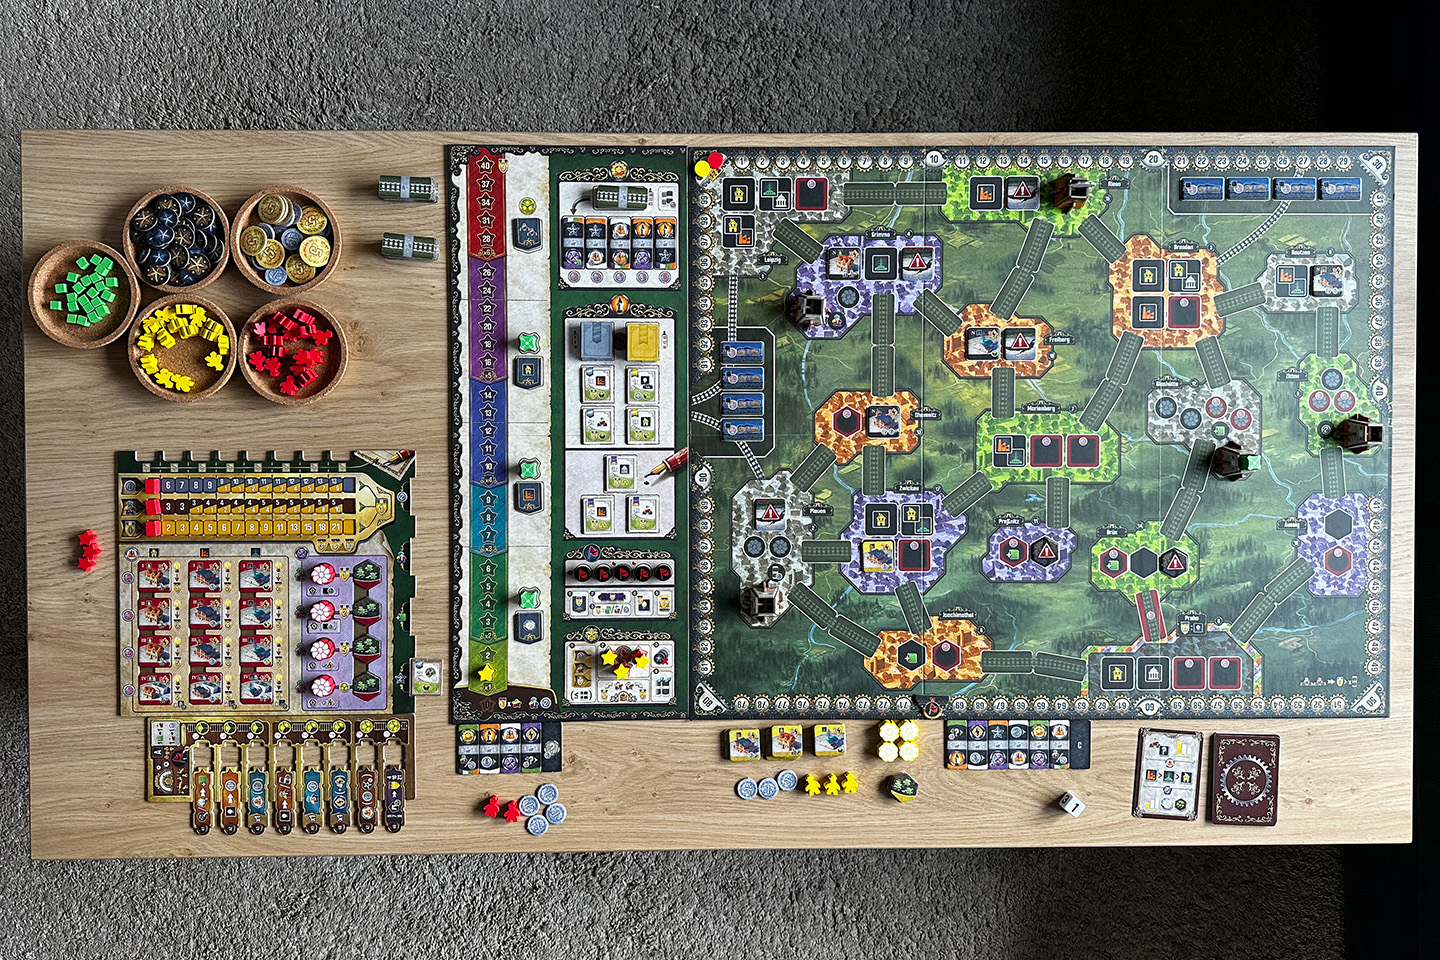
My very first impression was how heavy the box is. When you open it you know why… There is a lot in there. That makes it somewhat challenging to fit everything back in there after you’ve sorted and bagged all the components. The DIY “insert” doesn’t really help. Well, I’ve seen some people making it work, but it doesn’t look like it makes setup or teardown any easier, so I just ditched it and put everything in ziplock bags. Once you know where and how to put everything back in the box it’s OK though. Just a bit of a puzzle at first.
The cardboard quality is exactly what I’ve come to expect of Board & Dice games: a nice thickness and a matte finish. Every winter, when it gets darker earlier and I need to play with the lights on, I get reminded of how much I prefer matte cardboard over shiny cardboard.
The only minor downside when it comes to the cardboard components are the experiment boards and the technology tiles. The technology tiles are a really tight fit in the experiment boards and every time I see the thin parts of the experiment board bend when I slot in a technology tile I fear they might get damaged. No damage so far, but it doesn’t really feel sturdy.
The wooden components are OK, nothing special to report about them.
The art on the board and the components is, as usual, subjective, but I like it. It has a kind of steampunky vibe. Only the brightly colored cities on the game board feel a bit out of place.
Overall I am very pleased with the quality and the looks of this game. I only wish it didn’t take up so much table space. We have a rather big coffee table (70 × 135 cm or 27.5 × 53.15 inches) and that one is only just big enough for a solo game. Playing a two player game would be impossible on that table. For reference, the main game board (including the milestone board) is 92 × 56 cm (36.25 × 22 inches) and for a player board you need at least 40 × 30 cm (15.75 × 11.8 inches).
How much time does it take?
Nucleum doesn’t only take up a lot of space; it also has quite a hefty time requirement.
To start with, setup is very involved:
- You need to take the 20 base action tiles (these have dots on them) and add 10 random tiles of the remaining action tiles (without dots). Shuffle them together and create three face down stacks of 10 tiles. Place five tiles of the first stack on the board.
- Take the four different types of contracts. Take a random starting contract for yourself. Take 6/10 random silver/gold contracts and create shuffled and face down silver/gold draw piles. Place two of each contract on the board. Take a random purple contract tile of category 1, a random purple contract tile of category 2 and a random contract purple tile of category 3 and place them on the board.
- Place the eight coal tiles with the correct side up on the eight designated spaces.
- Use the bot’s decision cards to seed the game board with neutral buildings and block of certain buildings spots.
- …
There are 11 steps with substeps and recursion to the main setup. And then you still need to do your player setup, where you need to slot eight technology tiles in the correct order halfway into the experiment board and place the 12 buildings in their correct spot on your player board. The same for the four turbines and four mines.
I’ve literally timed it, and all in all, setup takes me 25 minutes.
After the game is done, you also need to put everything back into the correct baggies. I’ve timed that as well and this takes me 15 minutes.
I guess a specific bagging strategy could save time during setup, but that would be at the cost of making the teardown longer. I think you need to be realistic and take the 40 minutes for setup and teardown into account.
Playing the game can also be pretty long. Or at least, longer than the games I typically play. The length can vary a bit based on how fast the Baron recharges (if it takes more develop actions to gain more tiles, it can take a bit longer), but on average, a solo game against a single Baron takes me between 90 and 120 minutes. I’ll be honest and say I haven’t tried a game with two Barons, because that would make the game even longer and I just don’t have that amount of time available to me. (I don’t have a dedicated gaming space, so I can’t leave a game set up.)
So the all-in time—setup, playing and cleaning up—is about 130 to 160 minutes for me.
What is my verdict?
At the time I’m writing this Nucleum has a complexity rating of 4.09 on BGG, making it a fairly complex game. This compexlity does not come from a set of complex rules. Instead, the complexity comes from the decision space. And that’s the kind of complexity I like.
The action selection is simply put excellent. Selecting the order and the way to play your action tiles is a very interesting puzzle. Will you place a tile on the game board to expand your network and try to take that bonus action because of the color match? Or are you not ready to give up the action tile because you want to use that particular combination of actions on the tile a second or third time after your next recharge turn? And when will you take a recharge turn? This game really wants you to plan ahead. That’s something I’m usually not good at, but I don’t really mind it in Nucleum. It’s so satisfying to place a railway tile, expanding your network, letting you take the urbanize and develop actions so you can place a building in the city you just added to your network and grab a new action tile which will let you take the industrialize and energize actions to put down a turbine and energize the building you just placed in your next turn. But only if you planned for this and have the required workers and coins of course! So satisfying!
The four experiments also steer you a bit in a particular direction, making plays with experiment A feel different enough from plays with experiment B. In multiplayer games this provides some asymmetry, which you don’t have in solo plays, but it does provide you with different challenges and goals between plays, which adds to the longevity of the game.
Another thing I very much enjoy is the solo bot. If you have experience with bots designed by Dávid Turczi you might be expecting a bot with fiddly flowcharts and priorities. Think again! This is one of the easiest to manage Turczi bots I’ve played so far. The way the bot takes the actions really makes sense, which makes it easier to memorize how to do it. And if you forget a step, the handy overview at the back of the separate rulebook is all you need.
The bot isn’t only easy manage, it is also fun to play against. Partly because resolving the bots turns takes less time than doing your own turns, but mostly because it is an interesting opponent to take on. It has just the right amount of predictability with the 1,1,2,2,3,4 die giving you a good guess which actions it will take, and with just the right amount of randomness to keep things interesting. The Baron has managed to throw a wrench into my plans on numerous occasions.
The only real downsides for me personally are the amount of space and time the game needs. The table space required by Nucleum, even for a solo game, is impressive. I don’t have a dedicated gaming table, so if I want to play a game, I need the coffee or the dining room table. With two kids in the house, our tables are never completely empty, which is rarely a problem when it comes to playing board games, but for Nucleum the coffee table needs to be 100% empty (and it still is a tight fit) and if I want to use the dining room table, I also need to move things around to make room for the game. Another downside of not having a dedicated gaming table is that I can’t leave a game out on the table, so I need to be able to finish a game in one session. Nucleum takes me between 130 and 160 minutes (including setup and teardown) and the sad truth is that I rarely have a single stretch of that much time available to me. Additionally, the 25 minutes I need for setup have actually got me dreading to play the game a bit. If I have 2.5 hours to play something, do I want spend 40 minutes setting up and tearing down Nucleum? Or do I want to play two games of something else? I’ve had a hard time getting Nucleum played enough times for this review, and as much as I enjoy the game, I think the chances of it hitting the table in the future are pretty slim. Maybe twice a year? Which is a shame, because it is a really good game.
In short, if the space and the time requirements are not an issue, I can really recommend Nucleum; it is an excellent game with interesting action selection and network/route building with an easy to run yet challenging solo opponent.
(My score below only takes the gameplay into account, not my grievances about the required time and table space.)
Score
To make things easier for myself, I use the same scoring categories Board Game Geek uses.
Comments
I'm sorry, I don't support comments on my website. If you want to discuss the game or my review, feel free comment on this dedicated Instagram post or my review on BGG.